how to install a dry flagstone patio: 7 Powerful Steps 2025
Transform Your Outdoor Space with a Dry Flagstone Patio
Looking to create an outdoor living space that combines natural beauty with practical durability? A dry-laid flagstone patio might be exactly what you’re looking for. There’s something timeless about the organic shapes and earthy tones of flagstone that concrete just can’t match.
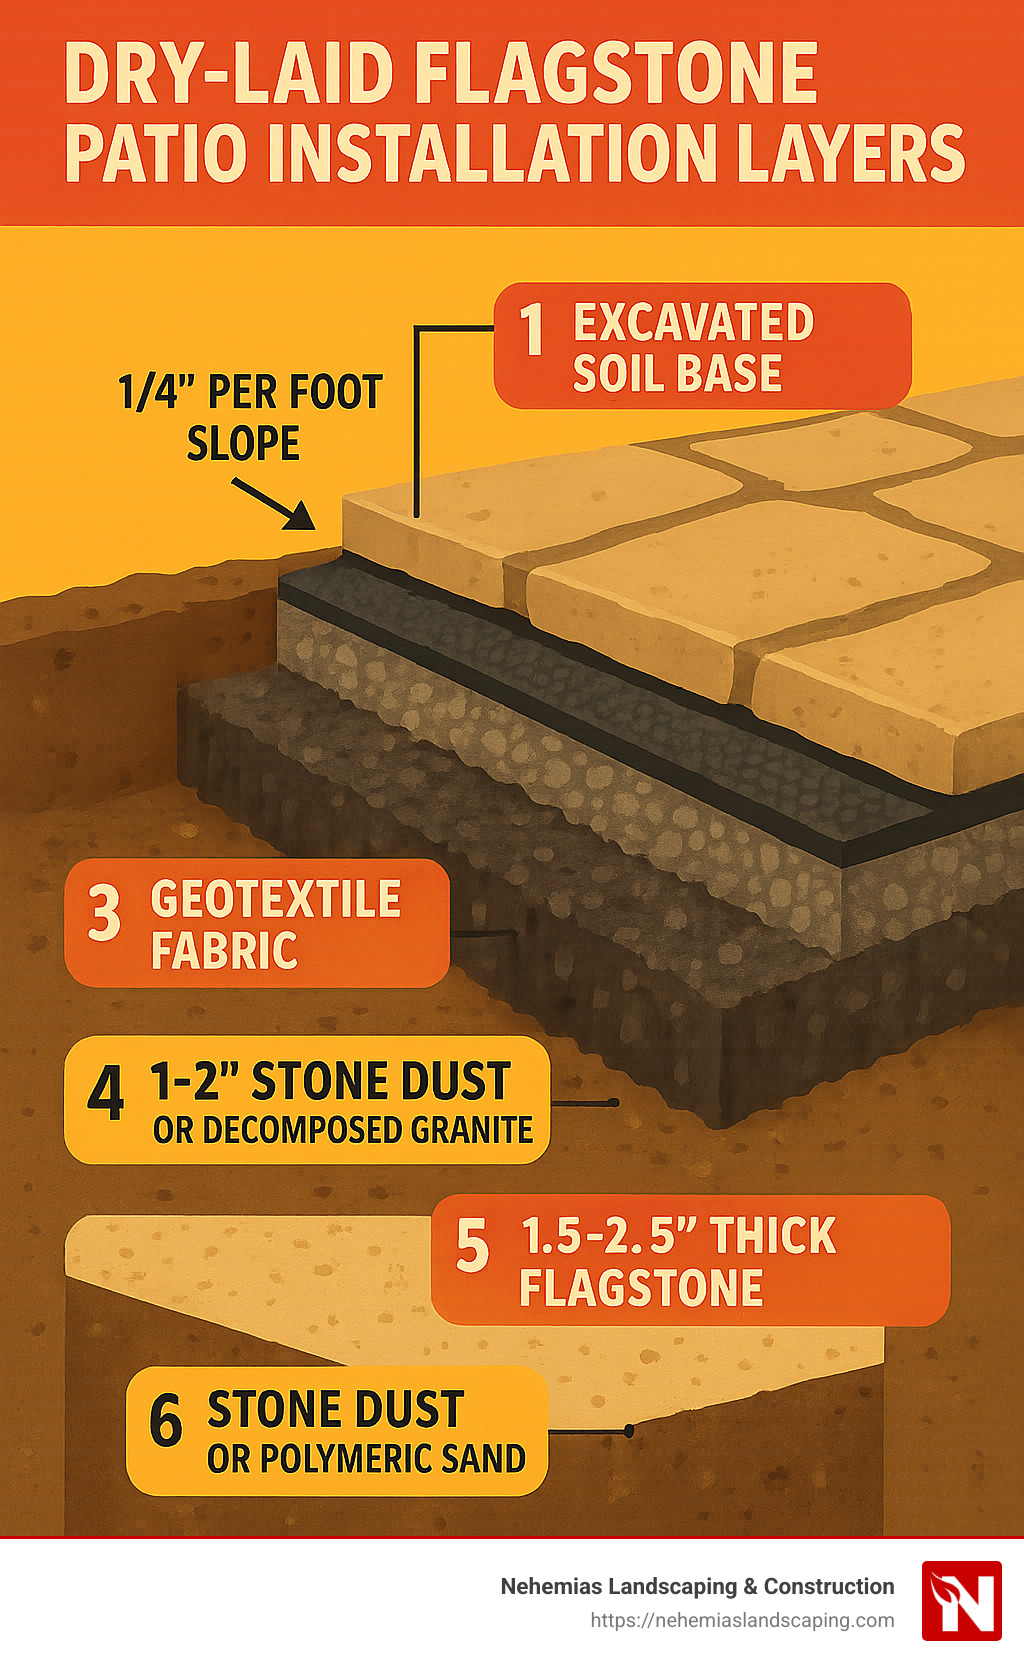
How to install a dry flagstone patio involves five key steps that transform your yard into an inviting outdoor retreat:
- Excavate the area to a depth of 6-9 inches
- Add and compact a 4-6 inch gravel base
- Spread a 1-2 inch layer of stone dust or decomposed granite
- Lay flagstones in your desired pattern, ensuring proper leveling
- Fill joints with stone dust, polymeric sand, or gravel
What makes flagstone special is how it blends with your landscape, creating a surface that looks like it’s always been there. Unlike the uniform appearance of concrete or pavers, each flagstone has unique colors, textures, and shapes that add character to your outdoor space.
“Building a dry-laid patio is labor-intensive, but can be a decent DIY project if you pay attention to all the little details,” as one experienced installer puts it. And they’re absolutely right – with some weekend warrior determination and attention to detail, you can create something truly spectacular that will last for decades.
The beauty of a dry-laid installation is its simplicity – no mortar or concrete needed. Instead, the stones rest on carefully prepared layers of compacted gravel and stone dust. This method allows for natural drainage and gives the patio slight flexibility with ground movement, making it particularly well-suited for regions that experience freeze-thaw cycles.
For budget planning, the average cost to build a 120 square foot dry-laid flagstone patio typically ranges from $1,800 to $2,200 for materials (based on internet data, not Nehemias Landscaping & Construction pricing). While not the cheapest option, it offers exceptional value considering its longevity and aesthetic appeal. With proper installation and minimal maintenance, your flagstone patio can be enjoyed for several decades.
Ready to roll up your sleeves and create an outdoor space that will be the envy of your neighborhood? Let’s dive deeper into what makes these patios so special and how you can build one that perfectly complements your home.
Curious about costs and specific installation methods? These resources might help:
– flagstone patio cost per square foot installed
– how to install a flagstone and pea gravel patio
– labor cost to install flagstone patio
What Is a Dry-Laid Flagstone Patio?
A dry-laid flagstone patio is like creating a beautiful stone puzzle without glue. Instead of using mortar or concrete to hold everything together, these patios rely on a carefully prepared base of gravel and stone dust, with the natural stones simply resting on top. Water can drain naturally through the joints between stones, making this an environmentally friendly option for your outdoor space.
“As there is no single ‘right way’ to install dry-laid flagstone, we have found the following to be a solid technique,” explains Devin, a hardscape expert who has installed dry-laid patios across various climates. What makes this method so appealing is how adaptable it is to different sites while still creating a sturdy, lasting surface.
Unlike mortared patios that lock everything rigidly in place with concrete, dry-laid installations accept a more natural approach. The weight of the stone and a properly compacted base work together to create a surface that can gently flex with the seasons – particularly important in regions with freeze-thaw cycles like Essex County, Massachusetts.
| Feature | Dry-Laid Patio | Mortared Patio |
|---|---|---|
| Installation Difficulty | Moderate (DIY-friendly) | High (Professional recommended) |
| Cost | $10-12 per sq ft (materials) | $20-30 per sq ft (materials) |
| Base Requirements | Compacted gravel + stone dust | Concrete slab |
| Drainage | Excellent (permeable) | Limited (requires slope) |
| Freeze-Thaw Performance | Flexible, accommodates movement | Can crack with ground movement |
| Repairs | Easy (individual stones can be replaced) | Difficult (may require section rebuilding) |
| Lifespan | Several decades with maintenance | Longer with proper installation |
| Joint Options | Sand, stone dust, polymeric sand, gravel | Mortar or grout |
Advantages & Disadvantages
There’s a lot to love about the dry-laid approach, but it’s not without its quirks. Let’s look at both sides:
On the plus side, dry-laid patios cost less than their mortared cousins since they don’t require expensive concrete materials. They’re also surprisingly DIY-friendly for homeowners willing to put in some sweat equity. The flexible nature of these patios means they can handle minor ground movement without cracking – a huge benefit in New England’s seasonal shifts.
Need to fix something? Just lift out the problem stone and reset it – repairs couldn’t be simpler. And your garden will thank you for the improved drainage, as water filters naturally through the joints rather than running off into your yard.
Of course, there are some trade-offs. You’ll need to refill the joints every few years as material settles or washes away. Without proper maintenance, weeds might decide to move in between your stones. The look is less formal than a mortared patio, with wider, more natural-looking joints. And while the surface is stable, you might notice slight movement underfoot initially until everything fully settles.
“Do not set flagstones in fine sand,” warns Devin emphatically. “Ants love fine sand. They will build their anthills all over the place.” This practical advice highlights why proper materials and installation techniques matter so much for long-term enjoyment.
Flagstone Types & Ideal Thickness
Choosing the right stone is where your patio starts to take shape. For installations in Essex County and surrounding Massachusetts areas, these options stand out:
Bluestone brings a sophisticated blue-gray palette to your patio. Quarried primarily in Pennsylvania and New York, it’s naturally suited to New England’s climate and offers excellent durability with a timeless look.
Sandstone offers warm, earthy tones ranging from soft buff to rich rust colors. Its natural texture provides good traction, even when wet.
Quartzite impresss with its crystalline sparkle and comes in crisp whites, sophisticated grays, and warm golds. It’s incredibly hard and durable – perfect for high-traffic areas.
Limestone provides a smooth, refined appearance in subtle creams and grays, though it’s somewhat softer than other options.
Slate delivers dramatic character with its distinctive layered texture and rich color palette of purples, greens, grays, and blacks.
When it comes to thickness, there’s no room for compromise in a dry-laid installation: flagstone for patios should be at least 1.5 to 2 inches thick to prevent cracking under normal foot traffic. For areas that will see heavier use, like driveways or outdoor kitchens, opt for stones at least 2 inches thick.
“Form fits function,” notes one installer. “Select thicker flagstone (3/4″ to 2-1/2″) for direct ground installation to avoid cracking.” Our experience at Nehemias Landscaping & Construction confirms this – thinner stones simply can’t handle the stresses of a dry-laid setup.
You’ll also need to decide between the rustic charm of irregular (natural) flagstone with its organic shapes, or the more formal appearance of cut (rectangular) flagstone with its uniform edges. While irregular stones create a wonderfully natural look, they do require more skill to fit together properly.
“Random-rectangular flagstone is easier to level than irregular flagstone,” advises one expert – particularly helpful advice if you’re tackling this as a DIY project. The uniform thickness and straight edges of cut stone create a more straightforward installation process, while still delivering beautiful results.
Planning Your Project: Layout, Drainage, and Budget
Before lifting a shovel, proper planning will save you time, money, and frustration. The success of your dry-laid flagstone patio begins with thoughtful preparation.
Start by selecting the ideal location for your patio. Think about how you’ll actually use the space – is it primarily for dining, lounging, or entertaining? Consider practical factors like proximity to your kitchen door, views from inside your home, and how sun and shade patterns change throughout the day. Existing trees, landscaping features, and natural drainage patterns should also influence your decision.
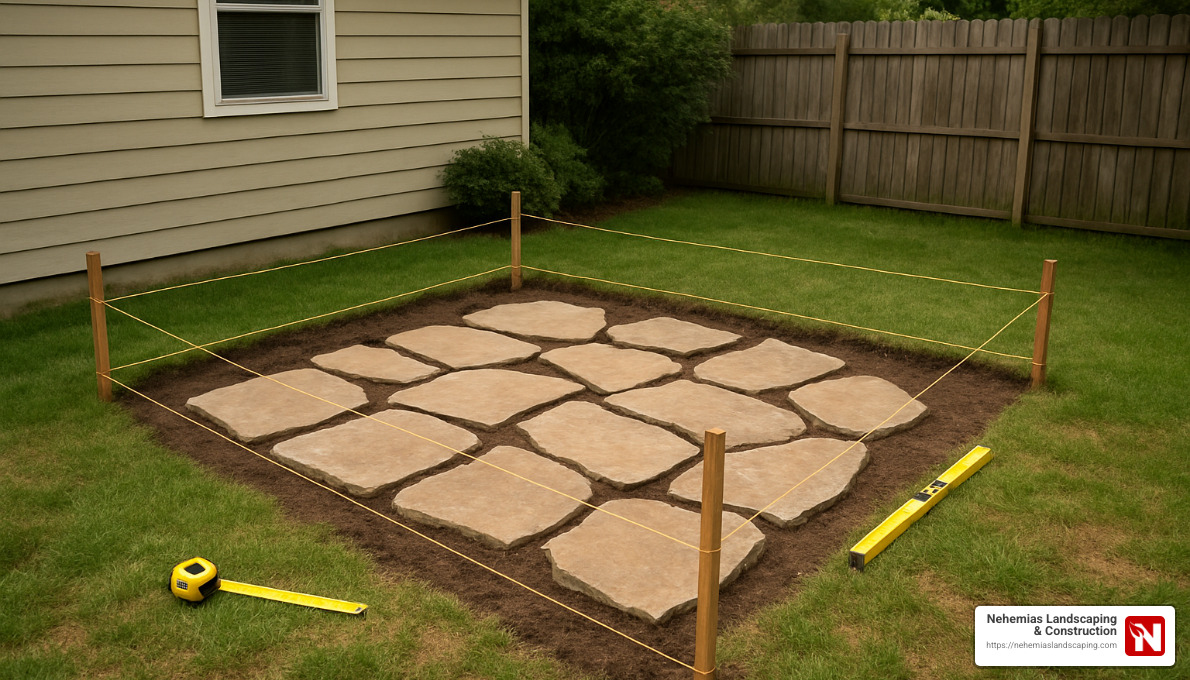
Once you’ve chosen your spot, mark the perimeter using stakes and string, garden hoses, or marking paint. For a perfectly square layout, here’s a pro tip: measure diagonally between opposite corners – the measurements should be equal if your layout is square.
Drainage is absolutely critical for your patio’s long-term success. All patios must slope away from your home’s foundation at approximately 1/4 inch per foot (or about 2.5 inches over 10 feet). This gentle slope is barely noticeable to the eye but essential for proper water management.
“Set a pitch of about 2.5 inches fall per 10 feet using string lines and a level,” advises an experienced installer. “Without this slope, water can pool on your patio or, worse, drain toward your home’s foundation, potentially causing thousands in damage.”
Safety first! Before digging, call 811 to have underground utilities marked. This free service is required by law in Massachusetts and prevents dangerous and costly utility strikes. It typically takes just a few days for utilities to be marked, so build this waiting period into your timeline.
When it comes to budget planning, dry-laid flagstone patios typically cost between $10-$30 per square foot for materials alone, with an average of about $15 per square foot (based on internet data, not Nehemias Landscaping & Construction pricing). The wide range reflects variations in stone type, quality, thickness, shape, and regional availability.
For a typical 12′ × 12′ patio (144 square feet), expect material costs between $1,440 and $4,320 based on internet averages. Adding professional installation can double these figures, which is why many homeowners in Essex County choose to work with experienced contractors like Nehemias Landscaping & Construction to ensure proper installation while staying within budget.
Looking for design inspiration? Check out these beautiful patio design ideas to spark your creativity.
Calculating Depth & Materials
Getting your excavation depth right is crucial for a stable, long-lasting patio. Think of it like building a cake with several distinct layers, each serving an important purpose:
Total excavation depth = Base gravel (4-6″) + Leveling layer (1-2″) + Flagstone thickness (1.5-2.5″)
For most residential patios in Massachusetts, we recommend:
– 6″ of excavation for well-draining soils
– 8-9″ of excavation for clay or poorly draining soils
“Dig 8–9 inches, compact the soil, then lay and compact 4–6 inches of road base,” recommends Devin, highlighting the importance of proper base preparation. “Skimping on your base is the fastest way to a failed patio.”
For material quantities, use these practical guidelines:
A ton of flagstone typically covers approximately 100-120 square feet for irregular flagstone or about 120 square feet for cut flagstone. Always order an additional 5-10% to account for waste, cuts, and broken pieces – you’ll thank yourself later!
For your base gravel (using 3/4″ crushed stone or “road base”), plan on about 1.5 tons per 100 square feet to create a properly compacted 4″ base. Your leveling layer of stone dust or decomposed granite will require approximately 0.5 tons per 100 square feet for a 1″ layer.
Design Tips for a Natural Look
Creating a natural-looking flagstone patio is both an art and a science. The best patios look like they’ve always been there, blending seamlessly with the surrounding landscape.
Mix stone sizes and shapes for a more organic appearance. Nature doesn’t create uniform patterns, so avoid too many stones of the same size. Place larger stones around the perimeter first to create a stable border, then work inward with smaller pieces, almost like framing a picture.
Joint width consistency matters more than you might think. Decide early whether you want narrow joints (1/2″-3/4″) for a more formal look or wider joints (1/2″-3″) for a rustic appearance. Stick with your choice throughout the installation.
If using various stone colors, mix them subtly throughout the patio. Pull stones randomly from different pallets to avoid concentrated color sections that can look artificial. The goal is a natural blend that mimics what you’d find in nature.
Think about how you’ll use the space. Create intentional seating areas by placing larger, flatter stones where furniture will sit to ensure stability. “Use larger, flatter stones in high-traffic or entertainment areas for compatibility with heels and furniture legs,” advises one expert. This practical consideration ensures your patio is not only beautiful but functional for everyday use.
Consider integrating features like fire pits or built-in seating during the planning stage rather than as afterthoughts. These elements will feel more cohesive when planned from the beginning.
Before final installation, try laying out your stones on the ground in the desired pattern, like a giant puzzle. This “dry run” allows you to arrange pieces for the most pleasing pattern and identify any stones that need cutting before installation begins. Take a photo from above to use as a reference guide during the actual installation.
Tools & Supplies Checklist
Getting ready for your dry-laid flagstone patio project means gathering the right equipment before you break ground. Trust me, there’s nothing worse than being elbow-deep in your excavation only to realize you’re missing a crucial tool!
When I started my first flagstone patio, I learned quickly that having everything on hand makes the process so much smoother. Here’s what you’ll need to transform your backyard:
Essential Tools:
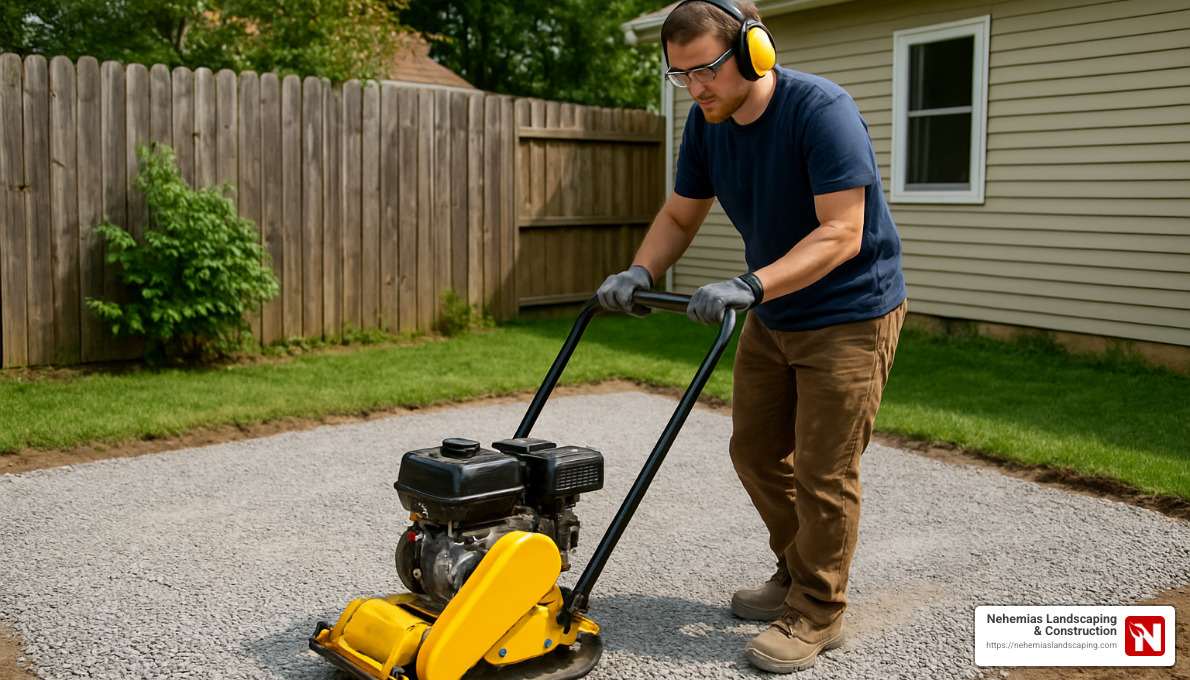
Your best friends for this project will be a flat shovel for clean excavation edges and a metal garden rake for leveling material. You’ll also need a sturdy wheelbarrow – you’ll be moving a lot of material! For compaction, either rent a plate compactor (about $100/day from local equipment rentals) or use a hand tamper for smaller projects.
“Unless you’re a powerlifter, you’re not getting a plate compactor in and out of a truck by yourself,” jokes one of our experienced installers at Nehemias Landscaping. These machines weigh upwards of 200 pounds, so bring a friend or ask about delivery options when renting.
For layout and leveling, grab a 4-foot carpenter’s level, mason’s string, line level, measuring tape, and some wooden stakes. Don’t forget your rubber mallet for adjusting stones and a hammer and masonry chisel for minor stone shaping.
If you’ll be cutting flagstone (and you probably will), an angle grinder with a diamond blade is invaluable. Always wear safety glasses and gloves when cutting stone – those tiny chips fly everywhere!
Materials You’ll Need:
The foundation of your patio starts with crushed gravel – look for what’s locally called “road base,” “crusher run,” or “3/4-inch minus.” This material compacts beautifully, unlike clean gravel which shifts under pressure. For a typical 120 square foot patio, you’ll need about 2 tons.
“Don’t use the stuff from the big box store; it’s junk,” warns our masonry expert about geotextile fabric. Spring for professional-grade landscape fabric from a stone supplier – it’s significantly more durable and prevents your base material from mixing with the subsoil over time.
For your leveling layer, you’ll need stone dust or decomposed granite (about 0.5 tons per 100 square feet). This creates the perfect bed for setting your flagstones.
The stars of the show – your flagstones – should be 1.5-2.5 inches thick for a dry-laid installation. Thinner stones are prone to cracking, while thicker ones are harder to level. Calculate about one ton for every 100-120 square feet of coverage.
Don’t forget edge restraints (plastic, metal, or stone) and spikes to hold them in place. These prevent your beautiful patio from spreading outward over time. Finally, you’ll need joint filling material – either stone dust, polymeric sand, or pea gravel – to fill the gaps between stones.
A garden hose with spray nozzle will be your best friend for moistening materials during compaction and cleaning up after your project is complete.
For more detailed information about the tools and materials needed for your project, check out our guide on DIY Flagstone Patio Installation. With the right equipment and quality materials, you’ll be well on your way to creating a beautiful outdoor living space that will last for years to come.
Step-by-Step: How to Install a Dry Flagstone Patio
Ready to get your hands dirty? Let’s walk through the entire installation process together. With some patience and attention to detail, you’ll create a beautiful patio that will be the highlight of your outdoor space for years to come.
Step 1 – Excavate to the Right Depth for a Dry Flagstone Patio
The foundation of a great patio starts with proper excavation:
First, outline your patio area using stakes and string, spray paint, or even a garden hose. This visual guide helps you see exactly what you’re working with. Take a moment to verify your layout is square by measuring diagonally between corners – if both measurements match, you’re good to go!
Next, set up level strings to establish your drainage slope. Magic number: 1/4 inch per foot away from your home. This slight pitch is barely noticeable to the eye but crucial for proper water drainage.
“Excavate 8–9 inches of soil, compact the subgrade, then add and compact 4–6 inches of 2a modified gravel,” advises Devin. This thorough preparation is what separates patios that last decades from those that shift after a few seasons.
Before you dig, always call 811 to have underground utilities marked – it’s free, required by law, and could save your life. Once cleared, remove the existing sod and vegetation using a flat shovel. Try cutting manageable squares rather than struggling with large sections.
Now dig to your required depth (typically 6-9 inches total). If you have good soil, save it for other garden areas! Once excavated, thoroughly compact the subgrade soil using a plate compactor or hand tamper. This prevents future settling that could make your patio uneven.
Pro tip: A standard contractor wheelbarrow holds about 6 cubic feet, and moving 2 tons of material (approximately 1 cubic yard) typically takes under three hours for one person. If access is tight, consider renting a small conveyor or arranging for equipment access.
Step 2 – Build & Compact the Gravel Base
Your gravel base provides both stability and drainage – two essential elements for a long-lasting patio:
Start by laying geotextile fabric over your compacted subgrade, overlapping seams by 6-12 inches. This fabric prevents your gravel from mixing with the soil below while allowing water to drain through.
“Don’t use the stuff from the big box store; it’s junk,” warns one expert about geotextile fabric. The professional-grade material from a landscape supply yard is significantly more durable and effective.
Extend your gravel base 4-6 inches beyond your planned patio edge. This extra width provides crucial support for perimeter stones that might otherwise shift over time.
Add your gravel in 2-inch “lifts” (layers), carefully raking to maintain your planned slope. Thoroughly compact each lift before adding the next layer using your plate compactor. The base should feel solid underfoot with minimal give when properly compacted.
“Lay and compact 6 inches of 2a modified gravel with the proper pitch,” recommends one expert. “Use a 4-foot level to verify pitch consistently.” This attention to detail during base preparation pays huge dividends in the longevity of your patio.
Safety first: When using a plate compactor, always wear eye and ear protection. Make multiple passes in different directions for thorough compaction. You’ll know the base is properly compacted when you no longer see indentations when walking on it.
Step 3 – Add the Leveling Layer (Stone Dust or DG)
The leveling layer is your patio’s cushion – providing a smooth, malleable bed for setting your flagstones:
Spread a 1-2 inch layer of stone dust or decomposed granite (DG) over your compacted gravel. Rake it evenly, maintaining the same slope as your base. This material may be sold under various names including “crusher fines,” “1/4″ minus,” or “quarry screenings” depending on your region.
“Since it’s composed of both bigger pieces of sand (1-2mm diameter) and fine dust, DG packs down similar to dirt but levels easily,” explains one installer. This combination makes it perfect for the leveling layer.
Use a straight 2×4 board to “screed” the surface – simply pull it across to create a smooth, even bed. Unlike the gravel base, do not compact this layer – it should remain loose to allow for adjustments when setting stones.
Lightly mist the surface with water to reduce dust during installation, but not enough to create mud. At the edges of your patio, consider installing a weed barrier that wraps up the sides to prevent grass from encroaching into your beautiful new patio.
Step 4 – Lay and Level Stones: How to Install a Dry Flagstone Patio Like a Pro
This is where your patio begins to take shape and your design comes to life:
Before placing a single stone, organize them by size and thickness. Having them sorted makes the process much smoother. Place your larger stones around the perimeter first – they’ll create a stable border for the rest of your patio.
Start at one corner or along a straight edge and work outward. Place each stone in your desired pattern, maintaining consistent joint widths (typically 1/2″ to 3″). The joint width you choose affects both the look and stability of your patio – narrower joints create a more formal appearance, while wider joints look more rustic.
“Arranging the flagstone pieces is the most important step in how your patio looks,” notes one expert. Take your time here – rushing the stone placement will be evident in the finished product.
After placing each stone, tap it gently with a rubber mallet to set it in the stone dust. Then check it for level in all directions using a 4-foot level. If a stone sits too high or low, simply add or remove stone dust underneath until it’s perfect. Remember to maintain your overall slope by checking periodically with a long straight edge and level.
For stones that need trimming, use an angle grinder with a diamond blade or the score-and-break method with a chisel. When cutting flagstone, always wear appropriate safety gear including eye protection, gloves, and a dust mask. Wet cutting is preferable to reduce dust.
“The cutting step ‘sucks’ if you aim for tight seams,” admits one installer honestly. It’s true – cutting flagstone can be time-consuming and dusty, but the results are worth the effort for a professional-looking finish.
Step 5 – Fill Joints & Secure Edges
The final step brings your patio together and ensures its longevity:
First, choose your joint filler. Your options include:
- Stone dust: Economical and matches the bedding layer, though it may need occasional refilling
- Polymeric sand: Hardens when wet to resist erosion and weeds – more expensive but longer-lasting
- Pea gravel: Decorative and drains well, though it won’t compact as tightly as other options
- Soil with ground cover: Creates a “living” patio with plants like creeping thyme between stones – beautiful but requires more maintenance
“If the flagstone is an ancillary sitting area or walkway that does not receive much traffic, we will consider installing the flagstone with plant material or gravel in the joints,” notes Roger Haywood of Accent Landscapes.
Sweep your chosen filler into the joints until they’re nearly full (leave 1/8-1/4″ below the stone surface). Then mist with water using a hose on “shower” setting to settle the material. For polymeric sand, be sure to follow the product instructions precisely – typically, you’ll need to sweep the surface completely clean before wetting.
“Sweep stone dust into joints, hose on a shower setting, and repeat until stones are 98% wobble-free,” advises Devin. This process, called “dressing,” is critical for long-term stability.
Add more filler and repeat the process until your joints are stable. If your patio doesn’t abut a structure or feature larger border stones, install edge restraints around the perimeter to prevent shifting.
Finally, clean the stone surface thoroughly with a broom and light water spray. Stand back and admire your beautiful new patio – you’ve earned it!
DIY Flagstone Patio Installation
Dry-Set Flagstone Patio Is DIY-Friendly
Maintenance & Common Mistakes to Avoid
A beautiful dry-laid flagstone patio isn’t just a weekend project—it’s an investment in your outdoor living space that can last for decades with proper care. The natural beauty of flagstone actually improves with age, developing a rich patina that adds character to your landscape. But like any worthwhile investment, it requires some attention to keep it looking its best.
“I always tell my clients that maintenance isn’t difficult, just consistent,” says Carlos from Nehemias Landscaping. “A little attention each season keeps small issues from becoming big problems.”
Your annual maintenance routine should begin each spring with a thorough inspection of your patio. Look for any stones that may have shifted during winter freeze-thaw cycles and check joint material that might have eroded away. Refilling joints annually is perhaps the most important maintenance task—it prevents stones from shifting and keeps weeds from establishing. Simply sweep in new stone dust or polymeric sand wherever joints appear low.
Weed control becomes much easier when you catch it early. Those tiny sprouts poking between your beautiful stones might seem harmless at first, but left unchecked, their roots can displace your carefully laid flagstones. For an eco-friendly approach, boiling water poured directly on weeds provides effective control without chemicals that might harm surrounding plants or contaminate groundwater.
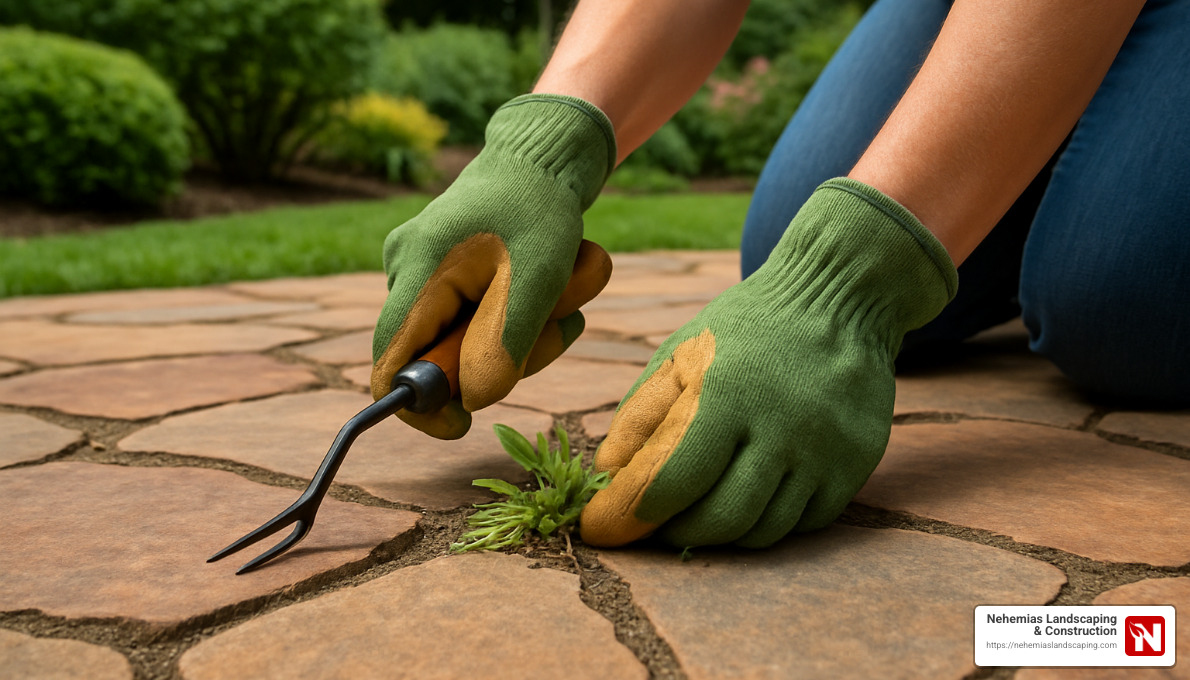
Regular cleaning keeps your patio looking fresh. A simple sweep with a broom removes debris, while an occasional gentle rinse with a garden hose washes away finer particles. For tougher stains or algae growth in shaded areas, a soft brush with mild soap and water usually does the trick—no need for harsh chemicals that might damage the stone or surrounding plants.
One advantage of how to install a dry flagstone patio properly is the ease of repairs. If a stone becomes uneven or starts to rock, you can simply lift it, adjust the bedding material beneath, and reset it—no jackhammers or concrete mixing required! This flexibility makes dry-laid patios particularly well-suited to New England’s dramatic seasonal temperature swings.
When winter arrives in Essex County, be mindful about snow removal. Metal shovels can chip or scratch your beautiful stones, so opt for plastic shovels or snow blowers with adjustable heights. If ice forms, calcium chloride is generally safer for your flagstone than sodium chloride (rock salt), which can cause pitting and erosion over time.
“The beauty of a properly installed dry-laid patio is that it’s surprisingly forgiving,” notes a veteran installer. “Minor wobbles tend to self-correct as the patio settles, resulting in an incredibly stable surface over time.”
But what about those mistakes that can derail your patio project before it even has a chance to settle? After years of installing flagstone patios throughout Essex County, we’ve seen it all.
Skipping proper base preparation tops our list of common mistakes. “The world has enough mediocrity, thank you very much,” Devin often reminds new crew members. A beautiful surface can’t compensate for a poorly prepared base—it’s like building a house on sand. The extra time spent on thorough excavation and compaction pays dividends for decades.
“Do not set flagstones in fine sand,” warns Devin emphatically. “Ants love fine sand. They will build their anthills all over the place.” This practical advice highlights why proper materials selection matters. Using fine sand in joints creates the perfect environment for ant colonies to establish—leading to undermined stones and constant maintenance headaches.
Improper slope is another frequent issue we correct on DIY patios. Water needs somewhere to go, and a flat patio becomes a puddle collector. That 1/4-inch per foot slope might seem insignificant during installation, but it makes all the difference during New England’s famous downpours.
Many homeowners are tempted to save money by using thinner stones, but insufficient stone thickness inevitably leads to cracking. For a dry-laid application, 1.5 inches is the absolute minimum, with 2 inches preferred for high-traffic areas. Those bargain-priced thin stones might look identical initially, but they won’t stand the test of time.
Forgetting edge restraints is like building a bookshelf without ends—eventually, things start sliding. Without proper edging, those carefully placed perimeter stones will gradually migrate outward, especially on sloped sites.
In Massachusetts, where frost can penetrate deeply, ignoring frost depth during base preparation is a recipe for an uneven patio come springtime. The substantial base we recommend isn’t excessive—it’s necessary protection against our region’s freeze-thaw cycles.
Perhaps most importantly, rushing the process undermines the entire project. Each step builds upon the previous one, and patience truly is a virtue when creating an outdoor space meant to last for decades. As we like to say at Nehemias Landscaping & Construction, “Do it right, or do it twice.”
With proper installation and regular maintenance, your dry-laid flagstone patio will provide a beautiful, functional outdoor living space for generations—a testament to craftsmanship and natural beauty working in harmony.
Frequently Asked Questions about Dry-Laid Flagstone Patios
What climate or soil conditions require special adjustments?
Here in Essex County and throughout Massachusetts, our distinct seasonal changes and diverse soil types present unique challenges when installing a dry flagstone patio.
If you’re working with heavy clay soil, you’ll need to dig deeper—about 8-9 inches instead of the standard 6 inches. Clay holds water like a sponge, which can lead to heaving during freeze-thaw cycles. A thicker gravel base gives that moisture somewhere to go rather than pushing up your beautiful stones.
“The worst mistake I see is treating all soil the same,” shares one of our experienced installers. “In Massachusetts, you might have sandy soil in your front yard and clay in the back. Each requires different preparation.”
For areas with sandy soil, you won’t need to dig quite as deep, but don’t skimp on the compaction. Sandy soil can shift more easily without proper tamping between layers.
Living in areas with heavy freeze cycles (hello, New England winters!) means you should aim for a minimum 6-inch base of compacted gravel. This helps get below the frost line and prevents the seasonal “heave and settle” that can make your patio look like a mini mountain range by spring.
If your yard has drainage issues, consider installing a French drain or drainage tile beneath your patio base. The small additional cost during installation can prevent major headaches later. Water is the enemy of any hardscape project—proper drainage is non-negotiable for long-term success.
Can I reuse thinner (under 1.5″) stone I already own?
We understand the appeal of using materials you already have on hand, but when it comes to flagstone thickness, there are good reasons for our 1.5-inch minimum recommendation.
Thinner stones simply crack more easily in a dry-laid application, especially in our Massachusetts climate where freeze-thaw cycles put extra stress on materials. However, you do have options:
If you’re determined to use thinner stone, consider a hybrid approach. Install a concrete base (about 4 inches thick) and mortar the thin stones in place. This provides the solid support thin stones need while still giving you the beautiful flagstone look.
Another practical solution is to use thinner pieces strategically. Reserve them for low-traffic decorative areas or as accent pieces within a patio made primarily of proper-thickness stones.
“I had a client who really wanted to use her grandmother’s thin flagstone,” recalls one of our team members. “We created a beautiful medallion feature in the center of the patio using those pieces, while using thicker stones for the main walking areas. She got to preserve the sentimental material while still having a durable patio.”
Using thin stone in a dry-laid application is essentially setting yourself up for future repairs. The money saved initially will likely be spent on replacements down the road.
How often will I need to top up polymeric or stone-dust joints?
Joint maintenance is part of owning a dry-laid flagstone patio, but it’s a small price to pay for the beauty and flexibility these installations offer.
For stone dust joints, plan on refreshing them every 1-2 years. You’ll notice when it’s time—the joints will appear noticeably lower than the stone surface, especially after heavy rains or snow melt.
If you’ve used polymeric sand, you’ll enjoy longer intervals between maintenance, typically 2-3 years before needing touch-ups. The polymer binding agents help it resist erosion and weed growth better than traditional materials.
The amount of traffic your patio receives dramatically affects maintenance schedules. A busy outdoor dining area might need annual joint refreshing, while a seldom-used meditation space might go several seasons without attention.
Steeper patio slopes tend to lose joint material faster due to water runoff. If your patio has a pronounced pitch (which is good for drainage!), check those downhill joints more frequently.
“I tell my clients to make joint inspection part of their spring cleanup routine,” says one of our senior installers. “It takes just a few minutes to check, and addressing small issues prevents bigger problems later.”
At Nehemias Landscaping & Construction, we find that most homeowners in Essex County need to do a complete joint refresh every 2-3 years, with minor touch-ups in between. A 50-pound bag of joint material typically costs $15-30 and covers about 75-100 square feet, making this maintenance task affordable as well as simple.
How to install a dry flagstone patio properly from the beginning minimizes future maintenance. Taking the time to create proper slopes, compact thoroughly, and fill joints completely during installation pays dividends in reduced upkeep for years to come.
Conclusion
There’s something truly special about a well-installed dry-laid flagstone patio. It’s not just a hardscape feature—it’s a natural gathering space where memories are made, from quiet morning coffees to lively evening get-togethers with friends and family.
After guiding countless homeowners through this process, we’ve seen how a flagstone patio transforms outdoor spaces with its organic beauty and timeless appeal. The natural stone creates a connection to the landscape that manufactured pavers simply can’t match.
The beauty of a dry-laid installation is its accessibility. While it requires some sweat equity and attention to detail, it’s a project that dedicated DIYers can tackle with proper planning. The key ingredients for success are patience, proper base preparation, and respecting the time-tested techniques we’ve outlined.
Success hinges on a few critical factors:
– Using flagstone that’s at least 1.5-2 inches thick for durability
– Creating a properly sloped and compacted base for drainage
– Taking your time with stone placement and leveling
– Filling joints completely and maintaining them yearly
– Addressing small issues promptly before they become big problems
The investment pays dividends for years to come. While the average cost ranges from $10-$30 per square foot for materials (based on internet data, not Nehemias Landscaping & Construction pricing), the return in property value and outdoor enjoyment makes it one of the most worthwhile landscape improvements you can make.
At Nehemias Landscaping & Construction, we’ve installed countless dry-laid flagstone patios throughout Essex County, bringing professional expertise to each unique project. We understand that every outdoor space has its own character and challenges—and we love helping homeowners create patios that feel like they’ve always belonged there.
Whether you’re ready to roll up your sleeves for a DIY trip or prefer to trust experienced professionals with your vision, understanding the proper installation process ensures you’ll end up with a patio that stands the test of time. With proper care, your flagstone patio will continue to age beautifully, developing a patina and character that only improves with the passing years.
For professional assistance with your flagstone patio project in Beverly, Danvers, Essex, Georgetown, Gloucester, and throughout Essex County, Massachusetts, contact Nehemias Landscaping & Construction. Our experienced team is ready to help you create the perfect outdoor space custom to your lifestyle and aesthetic preferences.