Irrigation System Installation: Top 3 Easy Tips 2025
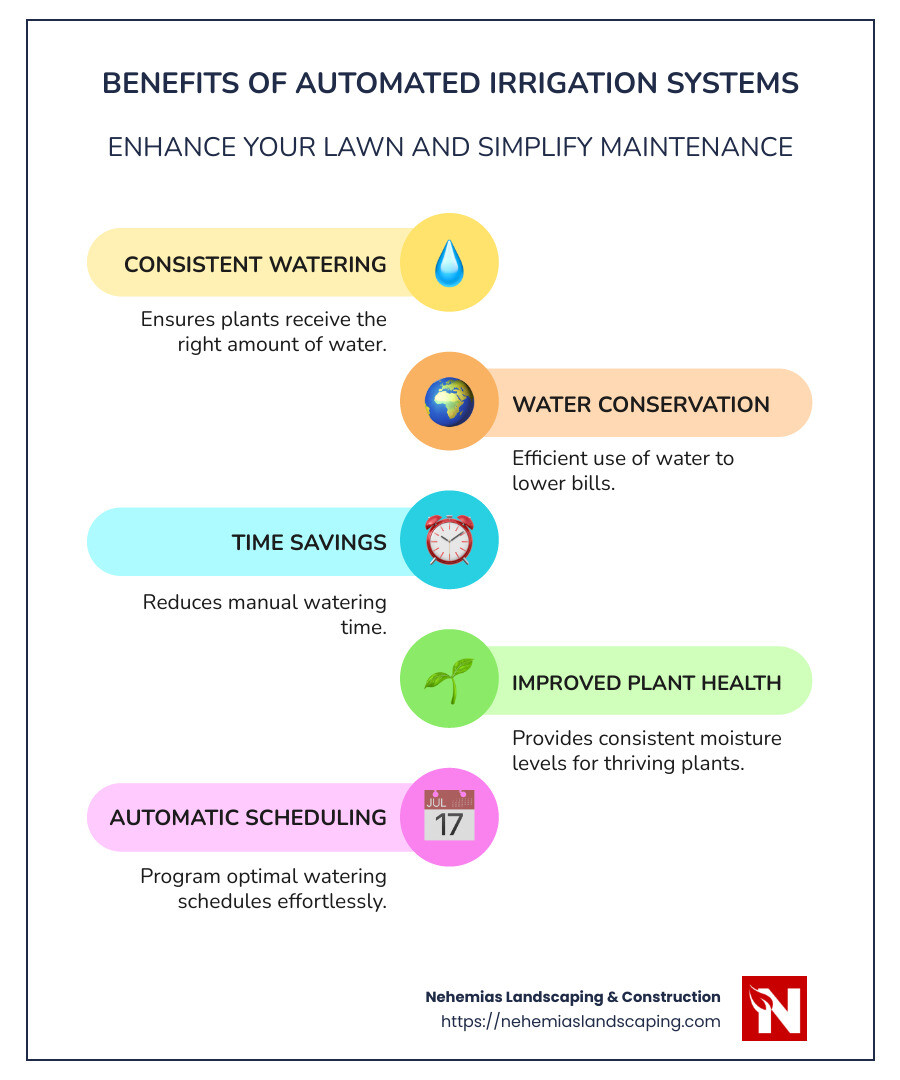
Irrigation system installation is the starting point for maintaining a lush, green lawn with minimal effort. For busy suburban homeowners, the right irrigation system can transform a backyard from stress-inducing maintenance into a delightful oasis. Here’s why irrigation matters:
- Consistent Watering: Ensures plants get just the right amount of water—no more, no less.
- Water Conservation: Uses water efficiently, saving this valuable resource and lowering utility bills.
- Time Savings: Reduces the time spent manually watering, freeing you up for other activities.
- Improved Plant Health: Keeps your garden thriving by providing consistent moisture levels.
Installing an automated irrigation system not only nurtures a beautiful lawn but also significantly simplifies lawn care. These systems can be programmed for optimal watering schedules without you having to lift a finger.
As Daniel Hillel noted, switching from old methods to modern, efficient systems “promotes healthier growth and robust gardens.” Whether you’re managing several flower beds or a single lush lawn, the benefits of an automated irrigation system can’t be overstated. With more family time and a greener space, it’s a win-win.
Planning Your Irrigation System
Before diving into irrigation system installation, it’s crucial to plan effectively. A well-thought-out plan ensures your garden gets the right amount of water where it’s needed most. Here’s how to get started:
Garden Assessment
First, take a good look at your garden. Measure its size and shape. Note down key features like flower beds, lawns, and vegetable patches. Different plants have different watering needs, so group plants with similar requirements together. This will make your irrigation system more efficient and easier to manage.
Water Source and Pressure Check
Identify where your water will come from. Is it a main water line, a well, or perhaps a rain barrel? Knowing your water source is essential for choosing the right components.
Next, check your water pressure using a pressure gauge. Attach the gauge to an outdoor faucet and ensure all other faucets are off. This reading will help you select the right pipes and emitters, ensuring your system works smoothly.
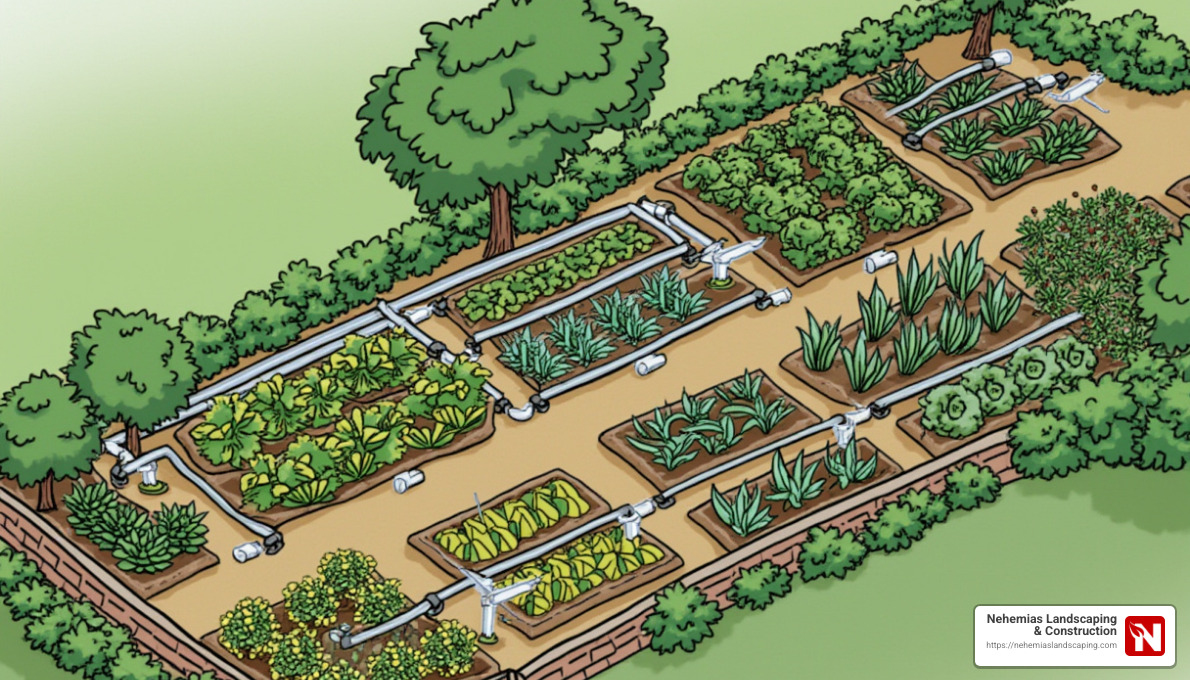
Designing Your System Layout
With your garden’s map in hand, sketch out where pipes and emitters should go. Make sure every area gets covered evenly, avoiding over-watering any section. Consider dividing your garden into zones if different areas have different watering needs. This allows you to control each zone separately, tailoring water delivery to plant requirements.
Local Regulations and Restrictions
Before you start digging, check with your local water authority or homeowners’ association. There might be specific regulations you need to follow, such as restrictions on water usage or requirements for backflow prevention devices. Ensuring compliance now will save you from fines or modifications later.
Experiment on a Small Scale
If you’re new to irrigation systems, try starting small. Install a simple drip setup in one garden zone. This hands-on experience will help you understand the installation process and make adjustments based on how your plants respond. Once you’re comfortable, you can scale up to a more extensive system.
By taking these steps, you’ll lay a strong foundation for a successful irrigation system that keeps your garden healthy and vibrant.
With a clear plan in place, you’re ready to move on to choosing the right irrigation system for your needs.
Choosing the Right Irrigation System
Choosing the right irrigation system is key to keeping your garden thriving while conserving water. Let’s explore three popular options: in-ground systems, soaker hoses, and drip irrigation.
In-Ground Systems
In-ground sprinkler systems are perfect for large, open spaces like lawns. These systems consist of pipes buried beneath the surface, with sprinkler heads that pop up to water the garden. They’re controlled by a timer, ensuring consistent and even coverage.
Advantages:
– Ideal for covering large areas efficiently.
– Provides regular, uniform irrigation.
Considerations:
– Installation can be costly.
– May waste water if not adjusted properly, especially in windy conditions.
Soaker Hoses
Soaker hoses are porous hoses that release water directly into the soil. They are great for garden beds and rows of plants.
Advantages:
– Easy to install and adjust.
– Water-efficient, minimizing evaporation.
Considerations:
– May not cover areas as uniformly as sprinkler systems.
– Can be prone to clogging or damage from garden activities and UV exposure.
Drip Irrigation
Drip irrigation systems deliver water directly to the base of each plant through a network of tubing and emitters. This method is highly efficient, conserving water by minimizing runoff and evaporation.
Advantages:
– Targets water directly to plant roots, promoting healthy growth.
– Reduces water waste significantly.
Considerations:
– Initial setup can be complex.
– Requires regular maintenance to prevent emitter clogging.
Efficiency and Plant Needs
When choosing your system, consider your garden’s specific needs. For example, a garden with mixed plantings, like vegetable beds and perennial borders, might benefit most from a drip irrigation system. On the other hand, a large lawn might be best served by an in-ground system.
Efficiency Tip: Group plants with similar watering needs together. This makes it easier to manage your irrigation system and ensures each plant gets the right amount of water.
Selecting the right irrigation system can transform your garden into a lush, green oasis without wasting water. With this knowledge, you’re now ready to move on to the installation process.
Irrigation System Installation
Starting on an irrigation system installation can be a rewarding project. Whether you opt for a DIY approach or hire professionals like Nehemias Landscaping & Construction, understanding the process is key.
DIY vs. Professional Installation
DIY Installation:
- Pros: Cost-effective, educational, and customizable. Perfect for small gardens or those who enjoy hands-on projects.
- Cons: Time-consuming and may require a learning curve. Mistakes can lead to water waste or plant damage.
Professional Installation:
- Pros: Expertise ensures efficient and proper setup. Saves time and effort, especially for larger or complex landscapes.
- Cons: Higher upfront cost. Less control over the process.
For homeowners in Beverly, Danvers, and surrounding areas, Nehemias Landscaping & Construction offers top-notch professional installation services, ensuring your system is custom to your garden’s needs.
Step-by-Step Guide to Installation
- Plan Your Layout: Sketch your garden and mark where pipes and emitters will be placed. Group plants with similar watering needs.
- Gather Tools and Materials:
- Tools: Shovel, pressure gauge, pipe cutter.
- Materials: Pipes/tubing, fittings, connectors, sprinkler heads or drip emitters, valves, pressure regulator, filter.
- Prepare the Site:
- Remove sod where necessary.
- Call 811 to locate underground utilities.
- Install Pipes:
- Use a vibratory plow or trench by hand to lay pipes. Aim for a depth of 6 to 12 inches.
- Avoid tree roots and splice-free pipe pulls.
- Connect Components:
- Attach fittings and connectors. Use double clamps on main lines for leak prevention.
- Install valves and pressure regulators.
- Place Emitters:
- Position sprinkler heads or drip emitters according to your layout.
- Connect to Water Source:
- Follow safety guidelines and consider hiring a plumber for complex connections.
- Test the System:
- Run water through the system to check for leaks and ensure even coverage.
- Make adjustments as needed.
Nehemias Landscaping & Construction
With years of experience, Nehemias Landscaping & Construction offers comprehensive irrigation services. From simple sprinkler systems to complex drip setups, their expertise ensures your landscape stays lush and green. They handle everything from planning to installation, allowing you to enjoy a hassle-free and efficient irrigation system.
Whether you’re a DIY enthusiast or prefer professional help, understanding the installation process helps you make informed decisions for your garden’s needs. Next, we’ll explore the cost considerations to help you budget effectively.
Cost Considerations
Understanding the costs involved in irrigation system installation is crucial for effective budgeting. Whether you choose a DIY approach or hire professionals like Nehemias Landscaping & Construction, knowing what to expect can help you make informed decisions.
Average Costs
The cost of installing an irrigation system varies widely depending on several factors. On average, you might spend between $500 to $5,000. This range accounts for different system types, sizes, and complexities. For a small DIY above-ground system, expect to pay around $300 for materials. Conversely, professional installation for a similar setup can exceed $500.
Cost Factors
Several elements influence the total cost of your irrigation system:
- System Type: In-ground systems are generally more expensive than above-ground ones due to the complexity of installation.
- Garden Size: Larger gardens require more materials and labor, increasing costs.
- Local Regulations: Compliance with local ordinances might necessitate additional components or professional services.
- Water Source and Pressure: Your water source type and pressure might affect the system’s components and installation requirements.
DIY vs. Professional
DIY Installation:
- Cost: Generally lower. A DIY in-ground kit might cost between $100 to $250, but be prepared for potential mistakes that could lead to additional expenses.
- Effort: Requires significant time and effort. Ideal for small, simple systems if you’re handy and enjoy DIY projects.
Professional Installation:
- Cost: Higher upfront cost, ranging from $600 to $1,800 for professional installation of small systems.
- Effort: Minimal effort on your part. Professionals bring expertise and efficiency, ensuring a well-functioning system.
Maintenance Costs
Once your irrigation system is installed, maintenance is key to longevity and efficiency. Regular checks for leaks, clogs, and proper emitter function can prevent costly repairs. Professional maintenance services can range from $50 to $200 per visit, depending on the system’s complexity and the services required.
In Beverly, Danvers, and surrounding areas, Nehemias Landscaping & Construction offers both installation and maintenance services, ensuring your system remains in top condition throughout the year.
By understanding these cost considerations, you can better plan your budget and ensure a smooth installation process. Up next, we’ll dive into frequently asked questions to address common concerns about irrigation systems.
Frequently Asked Questions about Irrigation System Installation
How much does it cost to install an irrigation system?
The cost of irrigation system installation can vary significantly based on several factors. On average, installing an irrigation system can range from $500 to $5,000. For a basic DIY setup in a small garden, you might spend around $300. However, for professional installations in larger areas, costs can escalate beyond $5,000. Key factors influencing the cost include:
- System Type: In-ground systems are typically more expensive due to their complexity compared to above-ground systems.
- Garden Size: Larger gardens require more materials and labor, increasing the total cost.
- Local Regulations: Compliance with local guidelines may require additional components, impacting costs.
- Water Source and Pressure: The type of water source and its pressure can affect the system’s components and installation requirements.
How hard is it to install an irrigation system?
Installing an irrigation system can be a manageable DIY project for those who are handy and enjoy working outdoors. However, it requires careful planning and execution:
- DIY Difficulty: For a small, simple system, a DIY installation can be straightforward, especially with a basic kit. However, it does require time, effort, and attention to detail.
- Time Estimate: Expect to spend a weekend or more on the installation, depending on the size and complexity of your garden.
- Professional Installation: If you’re dealing with a large or complex system, hiring professionals like Nehemias Landscaping & Construction can ensure a smooth, efficient installation without the hassle.
What is the best irrigation system to install?
When considering which irrigation system to install, drip irrigation often stands out due to its efficiency and water-saving benefits:
- Drip Irrigation: This system delivers water directly to the plant roots, minimizing evaporation and runoff. It’s ideal for gardens with plants that have varying water needs.
- Efficiency: Drip irrigation is highly efficient, making it a popular choice for conserving water while ensuring plants receive adequate hydration.
- Other Options: In-ground sprinkler systems are suitable for lawns, providing even coverage. Soaker hoses can be a simple, cost-effective option for smaller gardens.
Choosing the right system depends on your garden’s specific needs, size, and the local climate. By selecting the most efficient system, you can save on water bills and promote healthier plant growth.
These FAQs cover the essential aspects of irrigation system installation, helping you make informed decisions about costs, difficulty, and system types. In the following section, we’ll explore the benefits of professional installation and how Nehemias Landscaping & Construction can transform your outdoor spaces.
Conclusion
Choosing to install an irrigation system is a smart investment for maintaining a lush and healthy garden. While a DIY approach can be rewarding for smaller, simpler setups, the benefits of professional installation are significant, especially for larger or more complex landscapes.
Why Go Professional?
Professional installers, like our team at Nehemias Landscaping & Construction, bring expertise and experience to the table. We ensure that every component of your irrigation system is carefully planned and correctly installed. This precision minimizes water waste, optimizes plant health, and reduces the risk of costly mistakes.
- Expertise: Our professionals understand the intricacies of various irrigation systems, from drip systems to in-ground sprinklers. We tailor each installation to the specific needs of your garden, ensuring efficient water distribution.
- Quality Assurance: With professional installation, you benefit from high-quality materials and craftsmanship. This means fewer repairs and a longer-lasting system.
- Time-Saving: Let us handle the hard work. Our team efficiently manages the entire process, from planning to installation, freeing up your time for other activities.
Changing Outdoor Spaces
At Nehemias Landscaping & Construction, we take pride in changing ordinary outdoor spaces into stunning, functional environments. Our comprehensive approach to landscaping and irrigation ensures that your garden not only thrives but also improves the beauty and value of your property.
Whether you’re looking to refresh your backyard or undertake a large-scale outdoor renovation, our skilled team is here to guide you every step of the way. With our exceptional craftsmanship and attention to detail, we bring your vision to life.
Ready to lift your outdoor space with a professionally installed irrigation system? Contact Nehemias Landscaping & Construction today to schedule a consultation and find how we can help you achieve a greener, more vibrant lawn.