how to install brick steps: 7 Powerful Tips for Success in 2025
Building Brick Steps: The Perfect Blend of Function & Beauty
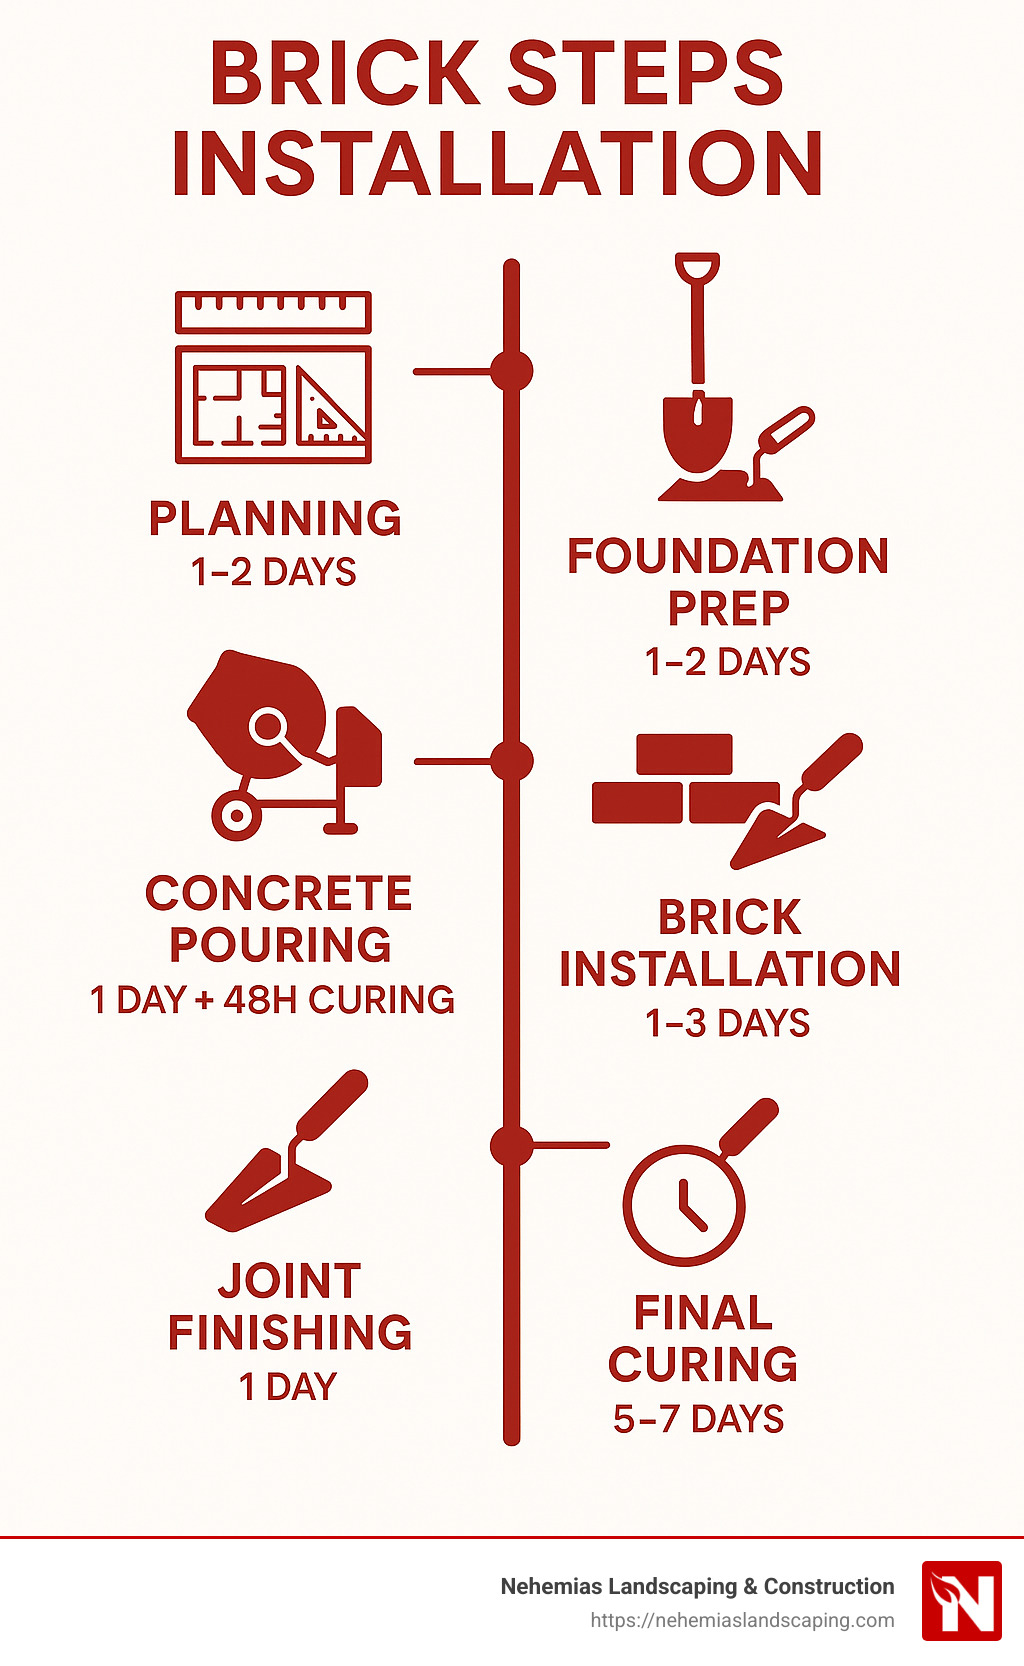
How to install brick steps in a nutshell:
- Pour a reinforced concrete footing (4-6″ thick with rebar grid)
- Build the step foundation using concrete blocks or pour concrete
- Apply Type M mortar in 1/2″ layers
- Lay bricks in your chosen pattern (typically rowlock for risers, stretcher for treads)
- Maintain 3/8″ mortar joints and check for level
- Tool joints when thumbprint-firm
- Allow 5-7 days for proper curing before use
Brick steps add instant curb appeal while providing a durable, long-lasting entrance to your home. How to install brick steps properly is a project that requires careful planning and execution, but the results can last for decades. Properly constructed brick steps built on a reinforced concrete footing can last 50 years or more with minimal maintenance.
“In my opinion, the single most important measure for producing enduring masonry steps — a reinforced concrete footing,” notes masonry expert John Carroll. This foundation is what separates steps that stand the test of time from those that crack and shift after just a few seasons.
While this project requires intermediate DIY skills, our step-by-step guide will walk you through the entire process, from planning to finishing touches. The typical cost for materials runs about $4-$6 per square foot, with a small set of stairs (two steps, about two feet wide) ranging from $200 to $500 including labor.
Whether you’re replacing crumbling concrete steps or starting fresh, brick steps provide a timeless look that improves your home’s value and creates a welcoming entrance. Let’s explore how to build brick steps that will stand strong for generations.

Important how to install brick steps terms:
– Brick Stairs Installation
– how to install handrail on brick steps
– install vinyl railing on brick steps
Why Brick Steps?
Brick steps offer numerous advantages that make them worth the investment:
- Durability: When properly installed on a concrete foundation, brick steps can last 50+ years with minimal maintenance.
- Timeless Appeal: Brick provides a classic, neat look that complements virtually any architectural style, from colonial to contemporary.
- Weather Resistance: Quality clay bricks withstand harsh New England winters, resisting freeze-thaw damage better than many other materials.
- Low Maintenance: Unlike wood steps that require regular staining or painting, brick steps need only occasional cleaning and resealing.
As Tim Carter of Ask the Builder notes, “The best way to think of traditional brick steps is to think of two sets of steps.” There’s the structural core (typically concrete or block) and the brick facing that gives the steps their beauty and durability.
Planning & Design Essentials
Let’s face it – beautiful brick steps don’t just happen by accident. The secret to a stunning, long-lasting installation starts with thoughtful planning and precise measurements. Before you mix a single batch of mortar, you’ll need to get the geometry right.
Most building codes call for a comfortable 6-7 inch rise with a 10-12 inch tread depth. For extra-comfortable steps (especially for older folks or those with mobility concerns), consider keeping risers under 7.5 inches with a generous 21.5-inch tread depth. This creates a gentle, easy-to-steer staircase that everyone will appreciate.
String lines become your best friend during this phase. They help you visualize the layout and ensure your steps will be straight and level. And don’t forget about drainage! Engineer a slight forward tilt (about 1/8″ per foot) on each tread to prevent water from pooling – nobody wants a mini swimming pool on their front steps during a rainstorm.
“When planning brick steps, I always tell homeowners to think about the complete package,” says Carlos Nehemias, owner of Nehemias Landscaping & Construction. “The right rise and run makes steps not just beautiful, but safe and comfortable for daily use.”
Wing walls (those decorative side walls that flank your steps) aren’t just for looks – they provide structural support and create a finished appearance. Consider adding these for both stability and style.
Measuring Total Rise & Run
Getting accurate measurements is where the rubber meets the road – or in this case, where the brick meets the mortar.
Start by measuring the total height from your landing surface (typically your walkway or driveway) up to the threshold of your door. This is your total rise. For example, if you measure 28 inches from driveway to doorway, and you want each step to rise 7 inches, you’ll need exactly 4 steps (28 ÷ 7 = 4).
A handy trick is creating what masons call a “story pole” – simply a straight piece of wood marked with the exact height of each step. This becomes your reference guide during construction and helps avoid the dreaded uneven step that makes everyone trip.
Remember to factor in the thickness of your materials! A standard brick is 2¼ inches thick, and mortar beds typically add another ½ inch. When planning your layout, aim for whole brick calculations wherever possible – your future self will thank you when there’s less cutting involved.
Picking a Pattern
The pattern you choose for your brick steps isn’t just about looks – it affects structural integrity too. Here are the classic patterns that have stood the test of time:
Running bond creates that classic brick look where each brick overlaps the one below by half its length. This pattern creates a strong, stable surface – perfect for treads that need to handle foot traffic.
Rowlock placement (bricks laid on their narrow edge) makes for excellent risers. They provide a strong face while using fewer materials.
Sailor course bricks stand on end with their narrow face showing, creating an attractive border that adds visual interest.
Soldier course is similar to sailor but with the wide face showing – a popular choice for decorative borders that make your steps pop.
Whenever possible, design your pattern to use whole bricks. This not only saves you the headache of making countless cuts but also creates a cleaner, more professional look. Before committing to mortar, try a dry-run layout to identify potential problem areas and ensure you have sufficient materials.
Site Layout & Permitting
Here in Essex County, Massachusetts, the frost line typically reaches down to 48 inches – a critical factor when planning your foundation depth. Before you start digging, a quick call to your local building department can save you major headaches down the road.
“We’ve seen too many DIY projects get shut down mid-construction because homeowners skipped the permitting process,” notes Carlos Nehemias. “A little paperwork upfront prevents a lot of problems later.”
When planning your site layout, pay attention to setback requirements from property lines, existing drainage patterns (water should always flow away from your home), and any utilities that might run through your work area. Most municipalities require inspections at various stages of construction, so build those potential delays into your timeline.
Mark your layout with stakes and string lines to create a physical blueprint. This simple step helps you spot potential issues before they become expensive problems and ensures your new steps will integrate beautifully with existing walkways and structures.
How to install brick steps successfully is all about getting these foundational elements right. With proper planning, your brick steps will not only look beautiful but will stand strong for decades to come.
Tools, Materials & Foundation Prep
Rolling up your sleeves for a brick step project? You’ll need the right tools and materials to create steps that will welcome visitors for decades to come. Think of this as your shopping list for success!
Materials:
For a quality installation, you’ll need Type M mortar, which offers an impressive 2500 psi compressive strength – perfect for outdoor steps that face harsh weather. Choose kiln-fired clay paver bricks (not the softer interior bricks) that can handle freeze-thaw cycles without crumbling. You’ll also need #3 or #4 steel rebar for reinforcement, concrete mix (at least 3000 psi), geotextile fabric to block weeds, and MOT Type 1 crushed stone for a solid sub-base.
Don’t forget the finishing touches: galvanized flashing where steps meet the house, silicone sealant for weatherproofing, and possibly polymeric sand for more stable joints.
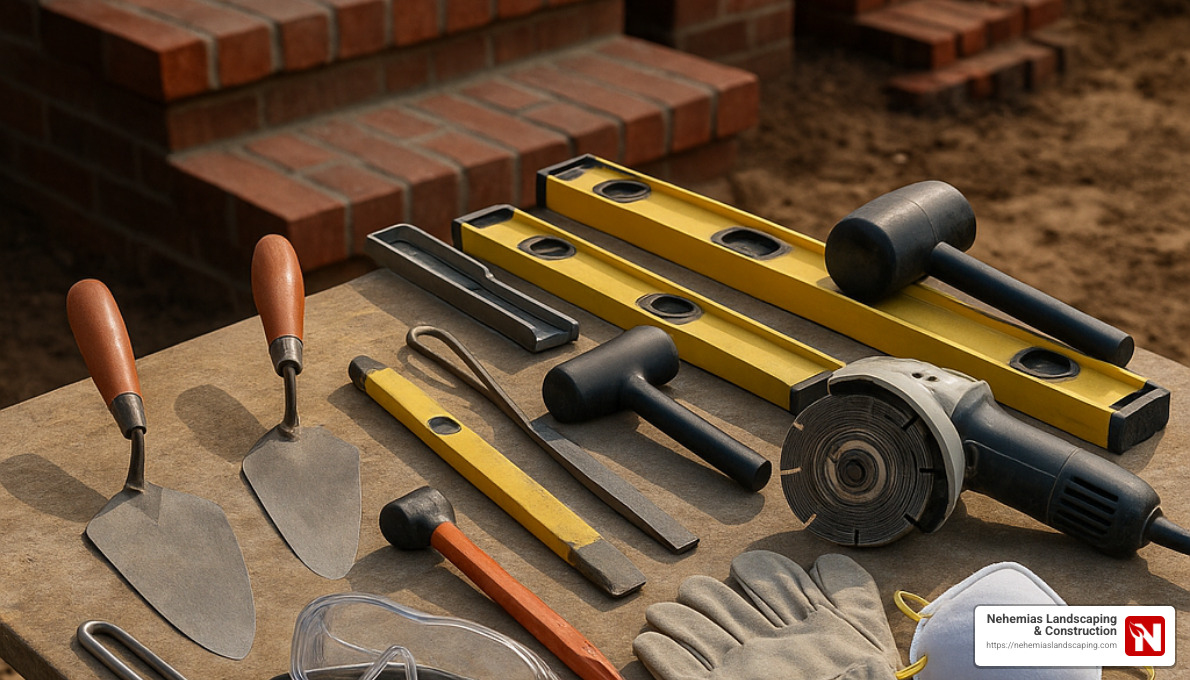
Your toolbox should include a wheelbarrow or mortar mixer (trust me, hand-mixing large batches is no fun!), mason’s trowel for spreading mortar, pointing trowel for smaller areas, and a brick jointer for those clean, professional-looking joints. You’ll constantly reach for your levels – both 2-foot and 4-foot – to ensure everything stays square and true. A rubber mallet helps tap bricks into position without damaging them, while a brick set (chisel) and angle grinder with masonry blade make clean cuts when needed.
And please, don’t skip the safety gear! Gloves protect your hands from caustic mortar, goggles shield your eyes from dust and chips, and a good dust mask keeps silica particles out of your lungs.

For more information about our comprehensive Masonry Services, visit our website.
Excavation & Sub-base
The secret to brick steps that last for generations lies beneath the surface. How to install brick steps that won’t shift or crack starts with proper excavation and sub-base preparation.
Begin by marking your excavation area generously – extend at least 6 inches beyond your planned step dimensions on all sides. This gives you working room and space for proper drainage. Then dig deep – at least 10-12 inches below grade for simple applications, but in Essex County’s freeze-prone climate, we recommend digging down to the frost line (48 inches) for the footing portion.
“No, you shouldn’t lay brick steps directly on dirt,” is advice we give to every homeowner. That shortcut might have been common practice before WWII, but it’s also why so many of those old brick steps have failed. Instead, remove all organic material, debris, and loose soil until you reach firm, undisturbed earth.
Next, roll out geotextile fabric at the bottom of your excavation. This simple step prevents weeds from growing up through your steps and helps stabilize the soil underneath. Top this with 4-6 inches of MOT Type 1 crushed stone, spreading it evenly across the base.
Compaction is crucial – don’t skip this step! Rent a plate compactor and make multiple passes until the surface is firm and level. You’ll know it’s properly compacted when you can walk across it without leaving footprints. This solid foundation prevents settling that would otherwise crack your beautiful brickwork.
Pouring the Concrete Footing
Think of your concrete footing as the unsung hero of the project – invisible when finished but absolutely essential for longevity. How to install brick steps that stand the test of time means getting this foundation right.
Start by building forms using 2×6 or 2×8 lumber to contain your concrete. Set them carefully at the correct height and with a slight slope (approximately 1/4″ per foot toward the front) to ensure water drains away from your home’s foundation.
The reinforcement grid is your insurance policy against cracking. Create a grid of rebar spaced at 12-inch centers in both directions. As John Carroll wisely notes, “Rebar in the footing is inexpensive ‘insurance’ (about $45 worth) against cracking even on solid soil.” Lift the rebar on small stones or commercial “chairs” so it sits in the middle of the concrete where it provides maximum strength.
When mixing concrete, aim for a 3-inch slump – a relatively stiff consistency that holds its shape better on stepped footings than wetter mixes. Pour the concrete into your forms, working methodically from the bottom step upward. Use a screed board (a straight piece of lumber) to level the surface, maintaining that slight forward pitch for drainage.
Patience pays off here – allow your concrete to cure for at least 48 hours before removing forms and continuing construction. In hot weather, cover with plastic and mist occasionally to prevent rapid drying that could weaken the concrete. This curing time might seem tedious when you’re eager to see your steps take shape, but it’s essential for developing full strength.
For those interested in the science behind reinforced footings, check out this resource on scientific research on reinforced footings.
How to Install Brick Steps: Step-by-Step
With your foundation properly prepared, it’s time for the exciting part—actually laying the bricks! This is where your project truly begins to take shape, changing from concrete and plans into a beautiful entryway.
The secret to professional-looking brick steps isn’t speed but consistency. Those uniform 3/8-inch mortar joints and perfectly level bricks don’t happen by accident. They’re the result of careful attention and the right techniques.
“The difference between amateur and professional masonry work often comes down to the consistency of the joints,” says Mario, one of our senior masons at Nehemias Landscaping. “Take your time with each brick—it’s worth it.”
When applying mortar, develop a smooth trowel technique that creates a bed joint about 1/2 inch thick. Don’t forget to “butter” the ends of each brick before placing them. This ensures full joints and stronger steps. Once placed, a gentle tap with a rubber mallet sets each brick at the proper height and level.

Dry-Run Layout: How to Install Brick Steps Without Surprises
Before mixing a single batch of mortar, take time for a dry run. This simple step saves countless headaches later:
Start by arranging your bricks in the chosen pattern directly on the foundation or on a flat surface nearby. Use small wooden sticks (about 3/8-inch thick) between the bricks to simulate where your mortar joints will be. As you build this mock-up, you’ll quickly spot any potential issues with fit or alignment.
Pay special attention to the edges, ensuring you’ll have equal overhangs on both sides. If your layout requires cutting bricks, now’s the time to figure out exactly where those cuts should be. How to install brick steps successfully often comes down to this planning stage.
“I always take photos of my dry layout with my phone,” says Carlos, another of our masons. “It gives me something to reference when I’m actually setting the bricks in mortar. Trust me, in the middle of the job, it’s easy to second-guess your pattern.”
Don’t rush this step—a thorough dry run might take an hour, but it can save you days of frustration later.
Building Risers & Treads: How to Install Brick Steps Like a Pro
Now for the main event—actually building your steps:
Begin by lightly wetting the concrete foundation. This prevents it from sucking moisture out of your mortar too quickly. Next, mix your Type M mortar according to package instructions until it reaches that perfect peanut butter consistency—stiff enough to hold shape but workable.
Start with the bottom riser, spreading a generous 1/2-inch mortar bed on the foundation. Set your rowlock bricks (positioned on edge) for the riser face, checking each one for level and plumb as you go. Be thorough with those vertical joints—they need to be completely filled.
For the first tread, apply mortar to the foundation behind your newly-placed riser. Lay stretcher bricks (flat) for the tread surface, maintaining those consistent 3/8-inch joints. Each tread should have a slight forward slope—about 1/8″ per foot—to ensure water drains properly rather than pooling.
“Water is the enemy of masonry,” emphasizes our founder at Nehemias Landscaping. “That slight slope is barely noticeable when you’re walking on the steps, but it makes all the difference for longevity.”
Continue building each riser and tread pair, working your way upward. For the top step, position it slightly below the door threshold to prevent water from entering your home during heavy rain.
How to install brick steps properly means thinking about water management throughout the process. Pack those mortar joints completely and consider how water will flow around your finished steps.
Checking Level, Plumb & Slope
Quality control isn’t just for factories—it’s essential for your brick steps too:
Your 2-foot level will become your best friend during this project. Use it to check each brick as it’s placed, ensuring it’s sitting perfectly. For a broader perspective, a 4-foot level helps verify the overall slope of each tread (remember that 1/8″ per foot forward tilt).
Don’t forget to use a torpedo level to confirm your risers are perfectly plumb (vertical). If something’s not quite right, don’t hesitate to adjust by adding or removing mortar as needed.
“I check for square by measuring diagonally across rectangular steps,” shares Eduardo from our team. “If both diagonal measurements are equal, your steps are square. If not, make adjustments before the mortar sets.”
These constant checks might seem tedious, but they’re what separates stunning brick steps that last generations from disappointing ones that need repairs after just a few seasons. When it comes to how to install brick steps that stand the test of time, these small details make all the difference.
The satisfaction of seeing perfectly aligned bricks, knowing they’ll welcome visitors to your home for decades to come, makes all this careful work worthwhile.
Finishing Touches: Drainage, Flashing & Railings
Those final details might seem small, but they’re what separate brick steps that crumble after a few years from ones that welcome generations of family and friends. Let’s make sure your hard work stands the test of time!
Water is both friend and foe to brick steps. We need it for mixing mortar, but once built, we want it flowing away from our steps as quickly as possible. That’s why each tread should have that slight forward slope (about 1/8″ per foot) – barely noticeable to anyone walking on them, but enough to keep puddles from forming.
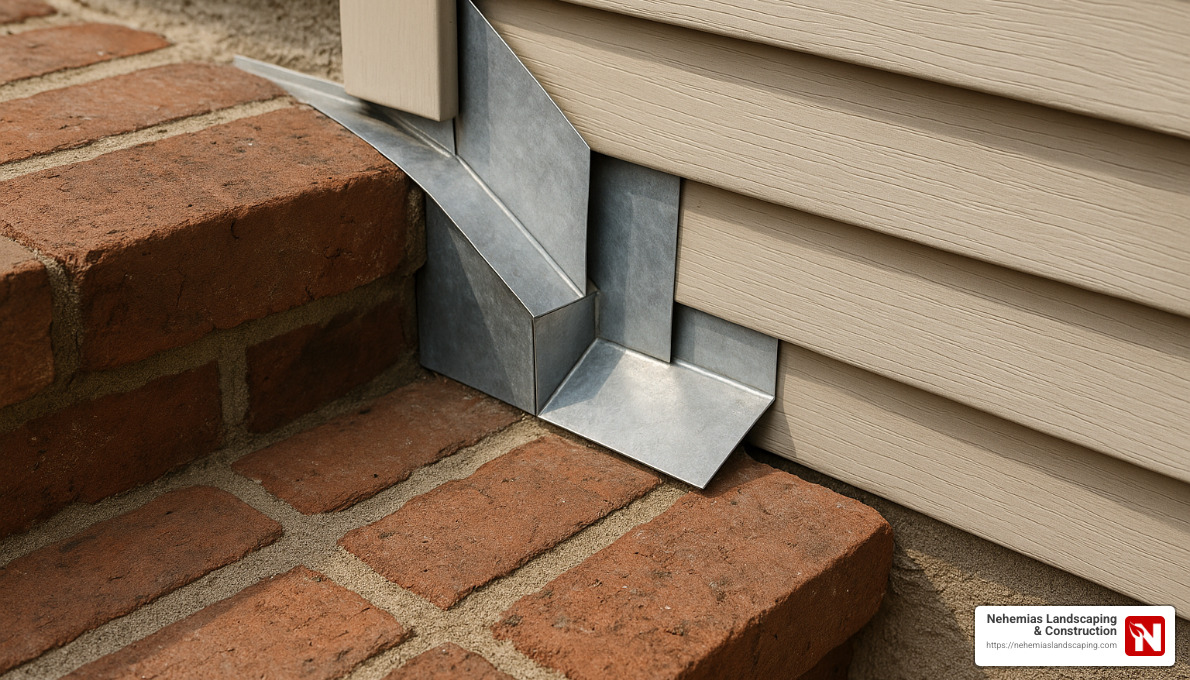
Where your steps meet the house wall is particularly vulnerable. This junction needs special attention with galvanized flashing that tucks neatly under your siding and extends over the top brick course. A good bead of silicone sealant along the top edge creates a watertight seal that prevents moisture from sneaking behind your steps and causing damage to your home’s foundation.
“I’ve repaired countless brick steps that failed prematurely because someone skipped the flashing,” says Mike Nehemias. “That $15 piece of metal can save you thousands in repairs down the road.”
For homes in areas with harsh winters or frequent freeze-thaw cycles, consider adding an extra layer of protection with a waterproof membrane between your concrete foundation and brick facing. Think of it as an insurance policy against Mother Nature’s mood swings.
Safety matters too – that’s where railings come in. Most building codes require handrails when you have three or more steps, typically at a height of 42 inches. Installing railings isn’t just about drilling holes and inserting screws – it requires careful planning and proper anchoring to ensure they’ll support someone who might need to catch themselves from falling.
For detailed guidance on adding this important safety feature, check out our comprehensive articles on How to Install Railing on Brick Stairs and additional Tips on installing handrails.
Tooling & Sealing Joints
The way you finish your mortar joints affects both the beauty and longevity of your brick steps. Timing is everything – you want that sweet spot when the mortar is “thumbprint hard.” That means when you press your thumb into it, it leaves an impression but doesn’t sink in completely.
Grab your concave jointer tool and run it along each joint with steady pressure. This compresses the mortar and creates a slightly curved profile that naturally sheds water instead of collecting it. Always tool the horizontal joints first, then tackle the vertical ones – this simple sequencing detail promotes proper water runoff and prevents water from getting trapped.
After tooling, use a soft brush to sweep away any loose mortar crumbs. Then exercise some patience (the hardest part for many DIYers!) and allow your creation to cure properly for 5-7 days before applying a high-quality breathable sealer designed specifically for brick and mortar. The sealer helps repel water while still allowing the masonry to “breathe” – trapping moisture inside brick is just as problematic as letting it in.
Common Mistakes to Avoid
Even seasoned masons sometimes make these errors, but now you can avoid them:
Uneven risers are more than just unsightly – they’re dangerous. Our brains are programmed to expect consistent step heights, and even small variations can cause trips and falls. Measure obsessively during construction and check your work frequently.
Skipping the footing is like building a house without a foundation. As one of our masons bluntly puts it, “No, you shouldn’t lay brick steps directly on dirt unless you enjoy rebuilding them every few years.” That proper concrete footing isn’t just a suggestion – it’s essential.
Mixing mortar too wet makes for easier spreading but creates weaker bonds. Aim for that peanut butter consistency – stiff enough to hold its shape when you pull the trowel away.
Neglecting flashing is a mistake that won’t show up immediately but will eventually lead to water damage where your steps meet your home. This small detail makes a huge difference in the lifespan of your steps.
Drilling into mortar for railings is asking for trouble. “Always put anchors into the brick, not the mortar,” advises our railing expert. “Mortar simply doesn’t have the strength to secure something people will be putting their weight on.”
Failing to account for drainage sets your steps up for a short life in climates with freeze-thaw cycles. Water that pools on steps will eventually find its way into tiny cracks, expand when frozen, and gradually destroy your beautiful work.
Rushing the curing process is tempting but costly. Those 5-7 days of waiting while the mortar fully cures might seem excessive, but they’re essential for developing full strength. Patience now means durability later.
With these finishing touches and precautions in mind, your how to install brick steps project will result in an entrance that’s not just beautiful today, but for decades to come. And remember, if you’re feeling overwhelmed, the team at Nehemias Landscaping & Construction is always here to help transform your ideas into reality.
Costs, Maintenance & Common Questions
Let’s talk dollars and cents – after all, knowing what you’re getting into financially is just as important as understanding how to lay those bricks perfectly.
Materials for brick steps typically cost between $4-$12 per square foot, depending on the type of brick you choose and your location. The classic clay pavers that give that timeless look tend to fall in the middle of this range, while specialty or antique bricks can push toward the higher end.
Professional installation will add labor costs, which typically run between $50-$200 per hour based on contractor experience and your location. (These figures represent average internet data, not Nehemias Landscaping & Construction pricing.)
When all is said and done, a simple set of brick steps (two steps, about two feet wide) might cost anywhere from $200-$1,500 as a complete project. More elaborate installations with multiple steps, curved designs, or wing walls can range from $1,500-$6,000 or more.
But remember – how to install brick steps properly is an investment in your home that pays dividends in both curb appeal and durability for decades.
“The brick steps I installed for my first home 30 years ago still look fantastic,” shares John, a Massachusetts homeowner. “They’ve outlasted two front doors and a roof replacement!”
Maintaining your brick steps is surprisingly simple:
Apply a breathable masonry sealer every 2-3 years to protect against moisture infiltration. This is especially important in New England’s freeze-thaw climate. Keep your steps swept clean of debris and vegetation that might trap moisture. When winter arrives, skip the salt (which can damage mortar) and opt for sand instead for traction. If cleaning is needed, a gentle pressure washing at low PSI (under 1500) will do the trick without damaging mortar joints.
For more comprehensive information about our Brick Stairs Installation services, visit our website to see examples of our work throughout Essex County.
DIY vs Hiring a Mason
Should you tackle this project yourself or call in the pros? It’s a question of time, skill, and tools.
Going the DIY route means you’ll need intermediate to advanced masonry skills – this isn’t a beginner-friendly weekend project. You’ll likely spend 1-2 weeks from start to finish, including preparation, construction, and proper curing time. Factor in specialized tool purchases or rentals (mixers, levels, trowels, etc.), which can add $100-$300 to your budget.
The primary benefit? You’ll save on labor costs, which typically represent 50-70% of a professional installation.
On the flip side, hiring a professional mason brings expertise that’s hard to match. A skilled team like ours at Nehemias Landscaping & Construction can typically complete a brick step project in just 2-3 days, with results that reflect years of experience. Professionals also handle permitting, ensure code compliance, and stand behind their work with warranties.
“I’ve seen too many DIY brick steps fail within a few years,” notes our lead mason. “The most common issues are inadequate foundations and improper mortar mixing – things professionals get right the first time.”
If you’re on the fence, consider that brick steps are a highly visible, structurally important element of your home. As Tim Carter of Ask the Builder wisely notes, “Building brick steps is not a project I would recommend for a rookie.”
Scheduled Care Checklist
Keeping your brick steps looking beautiful for decades is all about consistent, seasonal attention. Think of it as a simple rhythm that becomes second nature.
In spring, give your steps a thorough cleaning with a mild detergent and soft brush to remove winter’s grime. This is also the perfect time to inspect for any damage from freeze-thaw cycles.
During summer months, check for loose bricks or deteriorating mortar joints that might need repair. The warm, dry weather makes this the ideal season for any tuck-pointing work.
When fall arrives, clear leaves and debris that might hold moisture against your steps. Check that water drains properly away from your steps and foundation.
In winter, avoid using salt or harsh chemicals for ice removal – they can damage mortar and brick. Instead, keep a container of sand or kitty litter handy for traction on slippery days.
Annually, perform a more thorough inspection looking for cracks, settling, or drainage issues. Every 2-3 years, reapply a quality breathable masonry sealer to protect your investment.
“The single best thing you can do for brick steps is keep water moving away from them,” explains our founder. “Proper drainage and regular sealing prevent 90% of the problems we see with older installations.”
With proper installation on a concrete foundation at least 4-6 inches thick (reinforced with rebar), and this simple maintenance routine, your brick steps will likely outlast most other elements of your home’s exterior – becoming an enduring part of your property’s charm and character.
Frequently Asked Questions about Brick Step Projects
How deep should the concrete footing be in cold climates?
If you’re building brick steps in a frosty region like Essex County, Massachusetts, your concrete footing needs to extend below the frost line – typically 48 inches deep in our area. This isn’t just a suggestion; it’s essential protection against frost heave, that annoying winter phenomenon where freezing ground pushes upward and can turn your beautiful steps into a wobbly mess by spring.
Don’t have the ability (or desire) to dig that deep? You’re not completely out of luck. A well-designed “floating slab” foundation can work as an alternative. These foundations are engineered to move as a single unit during freeze-thaw cycles, requiring excellent drainage and a thick, properly reinforced concrete pad.
As masonry expert John Carroll wisely points out, “I would need to excavate to sound soil.” His simple statement captures an important truth – regardless of depth, what matters most is reaching stable ground that can properly support your structure for decades to come.
Can I lay brick steps directly on dirt?
I hear this question surprisingly often, and the answer is a resounding no. Laying brick steps directly on dirt is a recipe for future headaches and expensive repairs.
When bricks make direct contact with soil, several problems inevitably develop: the soil gradually compresses under weight causing uneven settling, winter frost pushes the steps upward in unpredictable ways, water penetrates and erodes the base, and eventually, your beautiful bricks crack and shift out of alignment.
Instead, take the time to create a proper foundation. Start by excavating down to firm, undisturbed soil. Remove all organic matter and loose dirt, then add a well-compacted layer of MOT Type 1 crushed stone. Next, pour that all-important reinforced concrete footing. Only then should you begin building your brick steps on this stable base. Your future self will thank you for this extra effort when your steps are still standing strong years later while your neighbor’s DIY shortcut project needs complete rebuilding.
What mortar type lasts longest in freeze-thaw zones?
When it comes to mortar for brick steps in areas with harsh winters like New England, Type M mortar is your best friend. With an impressive compressive strength of 2500 psi, it’s specifically formulated to withstand the punishing effects of repeated freezing and thawing while bearing significant weight.
What makes Type M special? It contains a higher proportion of Portland cement and less lime than other mortar types. This creates a stronger but slightly less flexible material – a worthwhile tradeoff for exterior steps that need to stand up to winter’s worst.
To get the maximum lifespan from your Type M mortar, follow these professional tips: mix it precisely according to the manufacturer’s instructions (resist the temptation to add extra water for easier workability), allow a full 5-7 days minimum curing time, apply a quality breathable sealer after proper curing, and ensure your joints are completely filled with no empty voids where water can infiltrate.
Even the best mortar needs proper installation. As one expert noted, “Type M mortar is commonly used for exterior brickwork and provides high compressive strength” – but only when properly mixed and applied by someone who understands its characteristics.
Conclusion
Installing brick steps is a significant project that, when done correctly, provides decades of beauty and function for your home. There’s something deeply satisfying about completing a brick step project – that perfect blend of timeless beauty and rock-solid durability that welcomes visitors to your home.
The journey from planning to completion involves several critical elements that ensure your steps will stand the test of time. A properly reinforced concrete foundation forms the backbone of your project, while quality materials – especially Type M mortar and kiln-fired clay bricks – provide the durability needed for New England winters. Your attention to detail in leveling, joint thickness, and drainage might seem tedious during construction, but these small details prevent big problems down the road.
Don’t underestimate the importance of proper flashing and waterproofing. These often-overlooked elements protect both your steps and your home from water damage. And remember, even the best-built steps require regular maintenance and sealing to reach their full 50+ year potential.
While many homeowners tackle brick steps as a DIY project, there’s no shame in recognizing when professional installation makes more sense. At Nehemias Landscaping & Construction, we’ve installed countless brick steps throughout Essex County, Massachusetts. Our experienced team understands the unique challenges of New England’s climate and ensures your brick steps will withstand freezing temperatures, heavy precipitation, and daily use for decades to come.
Ready to improve your home with beautiful, durable brick steps? Contact Nehemias Landscaping & Construction today for a consultation. We serve Beverly, Danvers, Essex, Georgetown, Gloucester, and all surrounding areas in Essex County, Massachusetts.
Visit our website for More info about our Brick Stairs services or call us to schedule a free estimate. Transform your entryway brick by brick with the region’s trusted hardscaping experts.