Affordable Patio: 8 Best Budget-Friendly Tips 2025
Why an Affordable Patio is Your Ticket to Outdoor Bliss
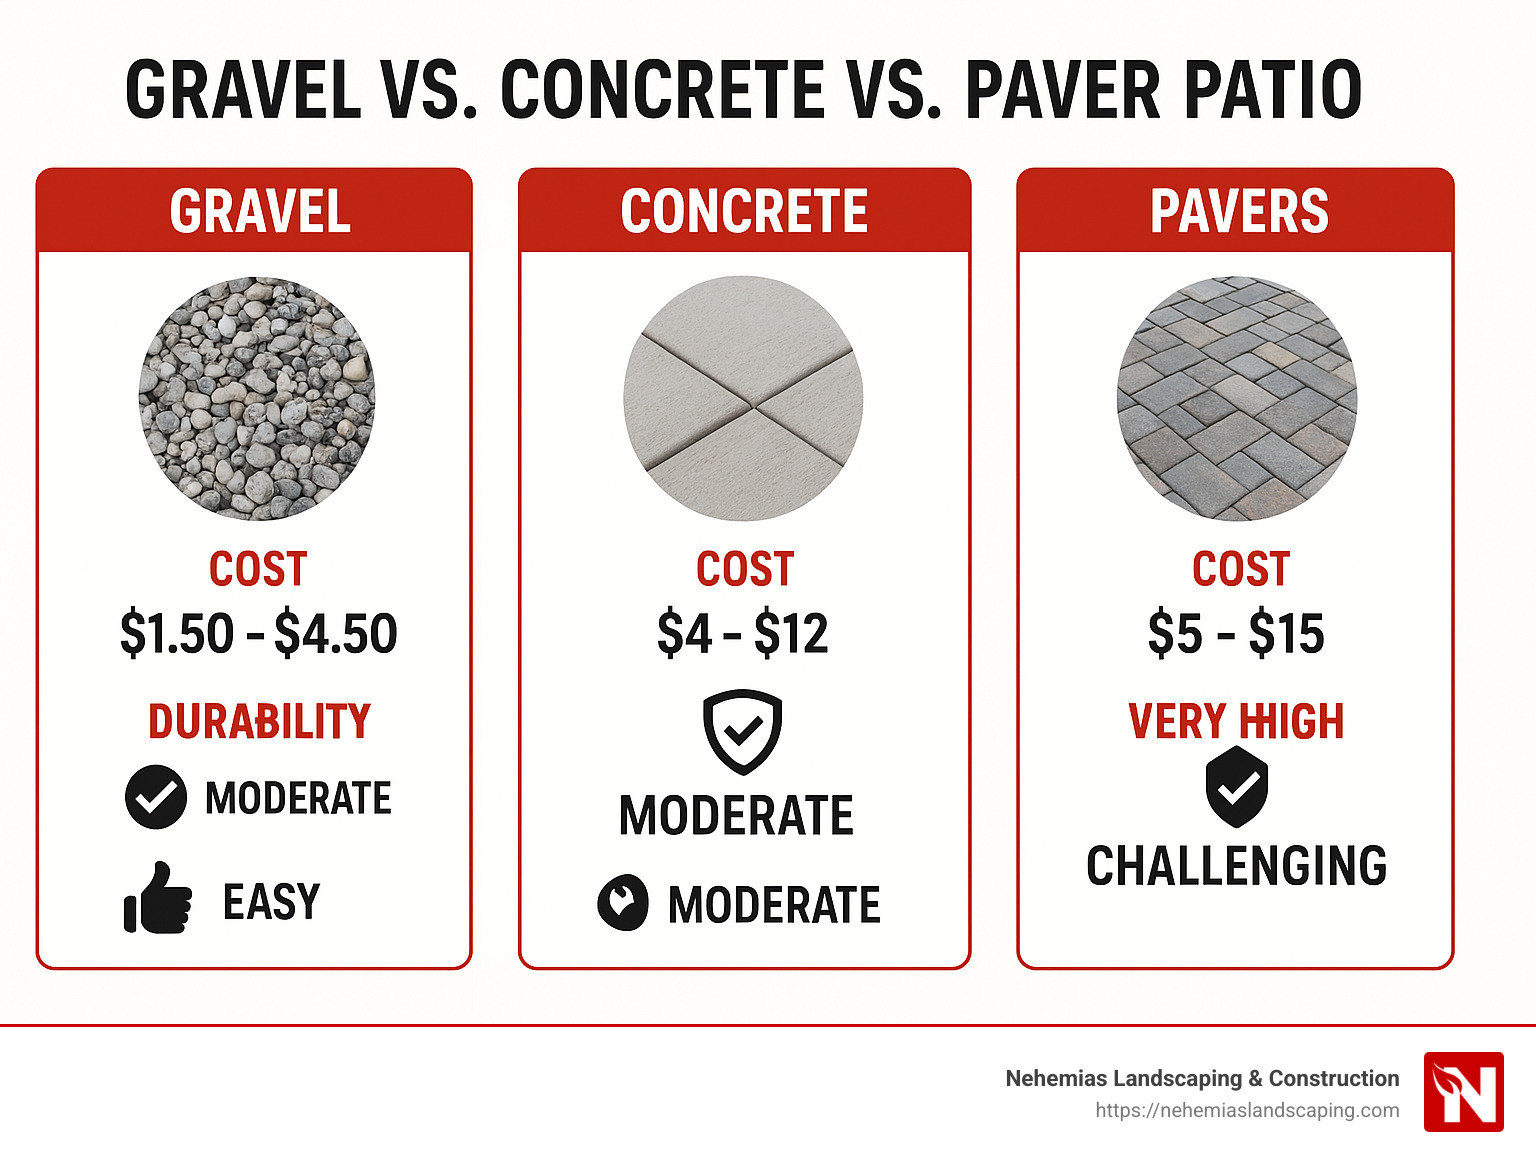
An affordable patio gives you the perfect outdoor escape—without breaking the bank. If you’re looking for quick numbers on cost-effective patio choices, here’s the short answer:
| Patio Material | Average Cost (per sq.ft.) | Durability | Installation Difficulty |
|---|---|---|---|
| Gravel | $1.50 – $4.50 | Moderate | Easy (great for DIY) |
| Concrete | $4 – $12 | High | Moderate |
| Pavers | $5 – $15 | Very High | Challenging (best professionally done) |
(Note: Prices shown are average ranges from internet data, not Nehemias Landscaping & Construction-specific costs.)
Outdoor living spaces like patios have become crucial for suburban homeowners. A patio doesn’t just add beauty—it’s your family’s personal spot to unwind, entertain, and enjoy nature together. But choosing materials and builders for your patio can feel overwhelming. Where do you start when you want style, comfort, and affordability all rolled into one?
In this guide, I’ll help you explore affordable, stylish, and durable options. We’ll cover budget-friendly materials, design tips, DIY secrets, and how to avoid costly mistakes, so you can create an outdoor haven for years to come.
Affordable patio basics:
– install a patio
– patio design near me
– patio installation services
1. Budget-Friendly Materials for Affordable Patios
Creating an affordable patio starts with choosing budget-friendly materials that still deliver on style, durability, and function. The truth is, you don’t have to spend a fortune to craft an inviting outdoor space—you just need to know what options to consider and why.
At Nehemias Landscaping & Construction, one of the pleasant surprises homeowners often experience is finding how many attractive, durable patio materials actually fit within their budgets. Let’s explore the best affordable materials, exploring their advantages, drawbacks, and typical costs.
| Material | Cost Range (per sq.ft.) | Pros | Cons | Lifespan |
|---|---|---|---|---|
| Gravel | $1.50 – $4.50 | Low-cost, easy installation, good drainage | Shifts easily, needs regular maintenance | 2-5 years before refreshing |
| Concrete | $4 – $12 | Durable, versatile, low-maintenance | Possible cracking, installation-intensive | 20-30+ years |
| Pavers | $5 – $15 | Attractive, durable, easily repaired | Higher upfront cost, professional installation recommended | 25-50+ years |
| Brick | $6 – $18 | Classic and eco-friendly, very durable | More expensive, requires skilled installers | 25+ years |
| Flagstone | $15 – $30 | Beautiful, natural appearance, highly durable | Costly, difficult to install | 25+ years |
(Note: Prices shown are average ranges from internet data—not specific costs from Nehemias Landscaping & Construction.)
Now, let’s look closer at the most popular affordable patio materials.
Gravel: An Affordable Patio Option
If you love quick and easy DIY projects that save money, gravel patios are your new best friend. With average costs between $1.50 to $4.00 per square foot, gravel is one of the most wallet-friendly choices for homeowners. As one industry report notes, “Gravel patios cost between $1.50 to $4.00 per square foot, making it an excellent choice for those looking to save money.”
But affordability isn’t gravel’s only charm. It also offers fantastic drainage, preventing water from pooling after a summer rainstorm. Installation? It’s a breeze—even for beginners. Plus, gravel blends effortlessly into natural landscaping, creating a relaxed, organic feel in your backyard.
You have several gravel options to choose from, each with unique traits. Pea gravel is smooth underfoot, ideal for casual lounging spaces or pathways. Crushed stone provides a stable surface, suitable for seating areas, while decomposed granite offers a firmer patio texture yet still allows water to drain easily.
If you’re curious about adding a polished look with pavers mixed into your gravel patio, check out our page on Affordable Patio Pavers. Combining gravel with strategically placed pavers creates visual interest without significantly raising costs—giving you the best of both worlds.
Concrete: Durability on a Budget
Concrete patios are ideal if you’re seeking something sturdy, stylish, and economical. At roughly $4 to $8 per square foot for basic concrete materials, plus an additional $2 to $4 per square foot for labor, concrete hits that sweet spot between cost-conscious and long-lasting.
Concrete has evolved tremendously over the years—gone are the days of plain, dull slabs. Today, you have many attractive options for customizing your patio. Stamped concrete, for example, lets you mimic stone, brick, or tile patterns at a fraction of the cost. Colored concrete allows you to match your home’s style and personality. Exposed aggregate shows off decorative stones embedded in the surface for added character, while polished concrete offers a chic, modern finish.
Our senior project manager, Tim, often says, “Concrete offers remarkable durability and design flexibility at a fraction of the cost of natural stone. We’ve seen concrete patios last 20-30 years with minimal maintenance, making them one of the best investments homeowners can make.”
Concrete installation is more involved than gravel, but skilled professionals can typically complete it quickly, often within just a few days. In Essex County, where harsh winters test the strength of outdoor structures, concrete’s durability and resistance to freeze-thaw cycles (when installed correctly with proper reinforcement and joints) make it an especially practical choice.
Pavers: Stylish Yet Affordable
Pavers offer homeowners an irresistible combination of beauty, practicality, and affordability. Basic concrete pavers start around $5 per square foot, making them slightly pricier upfront than gravel or concrete. However, their incredible longevity and minimal maintenance requirements make them a smart investment.
Why do homeowners love paver patios? For starters, pavers are exceptionally durable, often lasting 50 years or more. If one paver chips or cracks, you can easily replace it—no costly repairs required. Plus, they are flexible enough to handle temperature changes and ground shifts without cracking, unlike poured concrete.
Another advantage is their design potential. With countless shapes, colors, styles, and patterns available, you can create truly personalized patios that match your vision exactly. And the best part? Once pavers are in place, you can enjoy your outdoor space immediately—no waiting for concrete to dry or cure.
At Nehemias Landscaping & Construction, we’ve installed many beautiful paver patios. It’s no wonder our clients, like Larry Betro, often express their excitement: “We had a wonderful experience from start to finish. The team was great to work with!! We will have them back for more projects for sure!!”
In addition to concrete pavers, homeowners also frequently choose brick pavers ($6-$10 per square foot) or natural stone pavers ($15-$30 per square foot), each providing their own unique beauty and style. While brick and natural stone raise the budget slightly, concrete pavers have advanced significantly in appearance—often closely resembling higher-priced materials without the premium price tag.
While paver installation usually requires professional expertise, their long-term performance and aesthetics can make them the perfect choice for many Essex County homeowners looking for their ideal affordable patio solution.
2. Designing Stylish Patios Without Breaking the Bank
Creating a stylish affordable patio doesn’t have to drain your wallet. Sometimes the most inviting and Instagram-worthy outdoor spaces aren’t the most expensive—they’re the most thoughtfully designed! By blending creativity, smart design, and strategic material choices, you can lift your backyard into a charming outdoor retreat without overspending.

At Nehemias Landscaping & Construction, we always say, “We don’t just design patios—we design patios you’ll love to use!” Our mission is helping homeowners in Essex County create custom-feeling spaces that fit comfortably within their budget.
So how can you achieve a stylish, affordable patio that feels uniquely yours? Here are our tried-and-true tips:
Mix and Match Materials
One of the best ways to boost your patio’s style without busting your budget is by creatively combining different materials. For example, consider using affordable concrete or gravel as your main patio surface, then adding visual interest with a border or walkway made from premium-looking pavers. Or you could create a cozy focal area with natural stone accents or stepping stones set within an affordable gravel base.
Elizabeth Donohue, a recent client, shared her experience: “You guys killed it! Thanks for rocking out the back patio. We’re super excited to make new memories. Thanks for the great work guys.” When you blend materials thoughtfully, you get the best of both worlds—high-end aesthetics without high-end costs.
Accept Multi-Functional Elements
When space and budget are limited, every patio feature should pull double-duty. That means thinking creatively about multi-purpose elements. For instance, built-in benches can offer comfortable seating and hidden storage space for patio cushions or garden tools. A retaining wall doesn’t just hold back soil; it can be designed as extra seating for gatherings. Planters can define distinct areas while adding lush greenery, and a well-placed fire pit provides both warmth and a natural gathering spot for family and friends.
Upcycle and Repurpose
Want to add personality and charm while keeping costs low? Look no further than upcycling and repurposing! Salvaged materials like bricks from old structures can become pathways or edging. Wooden pallets can be turned into casual seating or tables. Reclaimed wood can add warmth and character as pergolas or privacy screens. Even old architectural elements, like vintage windows or doors, can become whimsical garden accents or decorative backdrops for your patio area.
Focus on Zoning and Layout
Believe it or not, thoughtful design can make your affordable patio feel spacious and high-end without adding square footage. The key lies in creating distinct, purposeful zones for dining, lounging, cooking, or gardening. Clearly defined spaces improve flow and make your patio feel intentionally designed. Use planting beds or container gardens to naturally separate your dining and relaxation areas. Position furniture to maximize your best views, encourage conversation, and guide guests comfortably through your patio.
Julia Nagle, another happy client, said it best: “I just had my patio done, and from start to finish, everything went amazingly smooth. No hidden costs, no surprises. The process was transparent and stress-free.” A well-planned layout makes even small budgets feel luxurious.
Invest in Quality Where It Matters Most
Even when creating a budget-friendly outdoor space, certain areas deserve a bit more investment. Spend a bit extra on your foundational elements—like proper gravel bases, solid concrete pours, or professional installation of patio pavers—to ensure longevity. These foundational investments prevent costly repairs and replacements down the road. Also, prioritize items you’ll use frequently, such as comfortable seating and durable outdoor lighting. You can always upgrade decorative touches or accessories later on.
By combining these design strategies, you’ll end up with an affordable patio that feels inviting, stylish, and custom-crafted to your needs. A beautiful patio isn’t determined by price, but by thoughtful planning and creativity—qualities our team at Nehemias Landscaping & Construction proudly delivers with each patio project we handle.
3. DIY Gravel Patio Installation: Step-by-Step Guide
If you’re looking to create the most affordable patio possible, gravel patios are truly your best friend. With average costs ranging from $1.50 to $4.00 per square foot (based on online industry data, not Nehemias Landscaping-specific pricing), it’s easy to see why gravel patios are a popular choice for budget-conscious homeowners. Plus, gravel patios offer a straightforward DIY installation that’s perfect for those weekend warriors among us.
“Gravel patios cost between $1.50 to $4.00 per square foot, making it an excellent choice for those looking to save money.”
Ready to roll up your sleeves and get started? Here’s our simple, step-by-step guide to installing your own gravel patio.
Tools and Materials You’ll Need
Before you dive in, gather all your supplies. You’ll need basic tools like a tape measure, shovel and spade for digging, a rake to level gravel, and a wheelbarrow to transport your materials. Don’t forget safety gear like gloves and protective glasses—your hands and eyes will thank you!
In addition, consider picking up a hand or power tamper to compact your patio properly, some landscape fabric to keep pesky weeds away, and a level to ensure your surface is even and drains properly. You’ll also need landscape edging and base materials such as crushed stone or road base, plus your chosen gravel. Optional stepping stones or pavers can add visual interest and convenience if desired.
Step-by-Step Installation Process
1. Plan and Mark Your Patio Area
Grab your tape measure, stakes, and some string to clearly outline your patio area. Take a moment to visualize how you’ll use your new outdoor space. Be sure to consider slope—aim for about 1/4 inch per foot away from your house to help with drainage. Before you start digging, remember to call 811 to have any underground utilities marked.
2. Excavate the Area
With shovel in hand, dig about 6-8 inches deep to create a solid foundation for your gravel patio. Remove grass, plants, roots, and any other debris. Slightly slope the base away from your home to help water drain effectively. Once you’ve cleared the area, compact the soil firmly using a tamper for added stability.
3. Add Landscape Fabric
Roll out landscape fabric across the entire excavated area. It should overlap by at least 6 inches to stop weeds from creeping through. Make sure the fabric extends slightly beyond your planned patio edges for full weed protection.
4. Install Edging
Next, install landscape edging around your patio’s perimeter. This edging helps maintain clean lines and neatly contains your gravel. Use stakes or spikes to firmly secure it, making sure it rises 1-2 inches above the gravel layer you’ll be adding.
5. Add Base Material
Spread about 3-4 inches of crushed stone or road base evenly over your landscape fabric, maintaining the intended slope. Give this layer a light mist of water to help with compaction before tamping it down thoroughly. A properly compacted base prevents shifting and helps your patio last longer.
6. Add and Spread Gravel
Now it’s time for the fun part! Spread your gravel over the base layer in manageable sections to a thickness of 2-3 inches. Pea gravel is gentle underfoot and perfect for relaxing spaces, while angular gravel tends to stay more firmly in place. Smooth and level the gravel with your rake, giving everything one final compacting for a sturdy surface.
7. Final Touches
At this stage, it’s all about making your affordable patio uniquely yours. Consider adding stepping stones or pavers for easy walking paths or accent areas. Sweep up any stray gravel and add some inexpensive container plants or solar lighting to improve the ambiance and functionality of your new patio.
“I have used Affordable Patio three times now for three different projects and I have always been happy with their service,” shared Tim Rueda. “The entire project is thoroughly planned out and executed appropriately.” This is sound advice, even if you’re DIY-ing—plan carefully and execute each step thoughtfully!
Pro Tips for DIY Success
A few quick pointers from our landscaping experts can help your gravel patio project go smoothly:
- Measure twice, buy once: For example, a patio measuring 10 by 10 feet at 2 inches deep typically requires about 0.62 cubic yards of gravel. Calculating your materials accurately can save you extra trips back to the supply store.
- Choose gravel wisely: Pea gravel offers great comfort for barefoot relaxation, while angular gravel is ideal for higher-traffic areas because it stays securely in place.
- Maintenance matters: Plan to lightly rake your gravel occasionally and refresh the top layer every few years to keep things looking sharp.
- Compact thoroughly: Take your time compacting each layer. Good compaction will ensure a stable, long-lasting foundation.
- Define patio borders: Using larger stones, bricks, or plants to outline your patio can give it a more finished, professional look.
DIY gravel patios are an excellent choice for cost-savvy homeowners. But if you find yourself short on time, tools, or energy, Nehemias Landscaping & Construction is here to help homeowners across Essex County. Our expert team can handle gravel patio installations professionally and efficiently, always with affordable pricing and outstanding results.
Now, grab your work gloves and get excited—your dream affordable patio is just a few steps away!
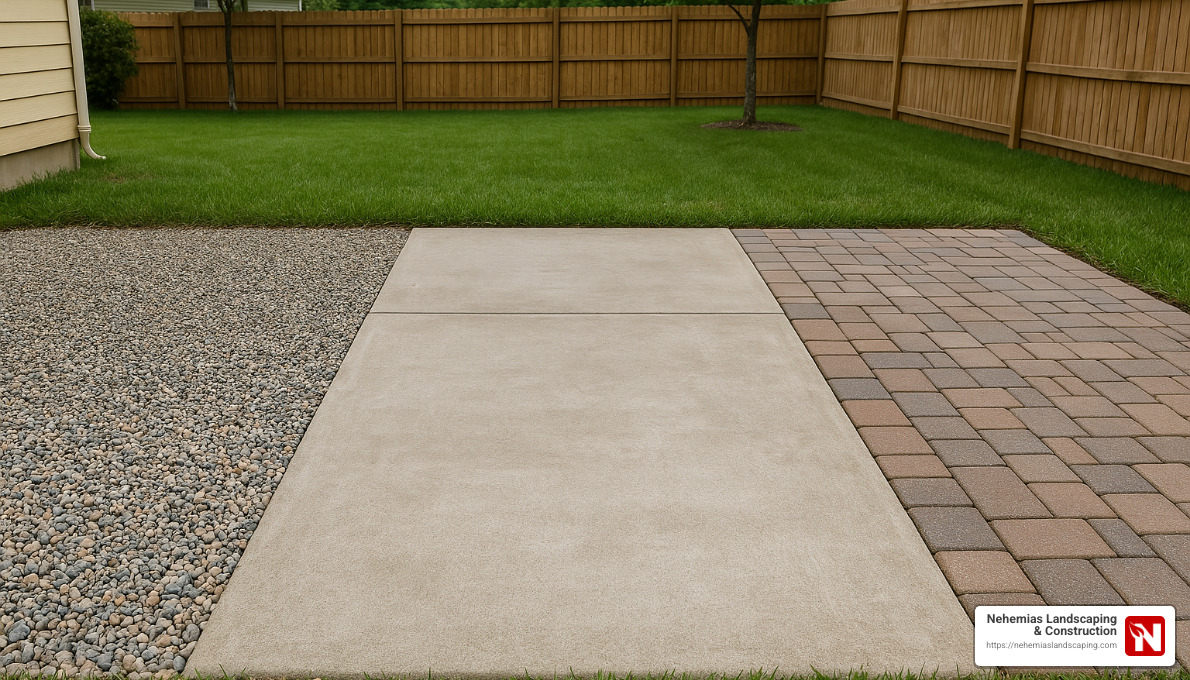
4. Comparing Costs: Gravel vs. Concrete vs. Paver Patios
When it comes to your affordable patio, knowing the full cost picture is essential. Material prices are important—but there’s more to the story. Let’s explore a friendly comparison of the three most popular patio choices: gravel, concrete, and pavers.
Comprehensive Cost Comparison
Here’s a straightforward breakdown comparing gravel, concrete, and paver patios—because a well-informed homeowner is a happy homeowner!
| Factor | Gravel Patio | Concrete Patio | Paver Patio |
|---|---|---|---|
| Material Cost | $1.50–$4.50/sq.ft. | $4–$12/sq.ft. | $5–$15/sq.ft. |
| Professional Installation | $4–$12/sq.ft. | $6–$18/sq.ft. | $10–$30/sq.ft. |
| DIY-Friendly? | High | Moderate | Low |
| Annual Maintenance | Moderate ($0.50–$1/sq.ft.) | Low ($0.10–$0.30/sq.ft.) | Low-Moderate ($0.20–$0.50/sq.ft.) |
| Repair Costs | Very Low | High | Low |
| Average Lifespan | Refresh every 3–5 years | 20–30+ years | 25–50+ years |
| Estimated 20-Year Cost | $10–$30/sq.ft. | $6–$20/sq.ft. | $9–$25/sq.ft. |
(Note: These are general average costs gathered from internet data—not specific prices from Nehemias Landscaping & Construction.)
“Working with the team was an awesome experience. As someone in the industry, I was truly impressed and couldn’t believe the standard held. Would recommend 10/10!” shared Brian Balado, underscoring the immense value professional installation brings to any patio project—whether it’s gravel, concrete, or pavers.
Beyond Initial Costs: The Value Equation
The price tag at the beginning isn’t the whole story. Each material has its own quirks, strengths, and ongoing costs you should keep in mind:
Gravel Patios: Easy on the Wallet, but More Hands-On Care
Gravel patios are the friendliest choice for tight budgets and DIY enthusiasts. They’re easy to install and bring a casual charm to your backyard. But keep in mind, gravel patios need regular attention—think raking, leveling, and occasional gravel top-ups. While initial costs are low, ongoing maintenance adds up over time.
They’re perfect if you’re looking for an inexpensive solution now, or if you prefer a rustic look and don’t mind a little weekend upkeep.
Concrete Patios: The Reliable Middle Ground
Concrete patios sit right in that sweet spot: moderately priced, highly durable, and relatively low-maintenance. They offer a ton of design flexibility—like stamped concrete that mimics brick or natural stone—without the higher costs.
But if you’re in Essex County like us, you’re familiar with those harsh freeze-thaw cycles. Unless properly installed and reinforced, concrete patios can develop cracks requiring repairs. Still, with good installation and minimal annual care, concrete often ends up being the most cost-effective option in the long run.
If durability and a balanced initial investment matter most to you, concrete is likely your best bet.
Paver Patios: More Upfront, but Best Resilience & Charm
Pavers offer the neat “wow factor,” incredible durability, and design flexibility that’s best by gravel or concrete. Yes, they cost more to install upfront, but their longevity and ease of repair outweigh that initial expense.
Here’s the hidden bonus: if a single paver gets damaged, you simply replace that one piece instead of tackling larger, pricier repairs. Plus, pavers naturally handle New England’s shifting ground better thanks to their flexible joints.
Pavers are an ideal choice if you want an upscale look and outstanding longevity. They also boost your home’s curb appeal, increasing your property’s overall value.
Regional Considerations for Essex County Homeowners
Here in Essex County, our unique climate affects how each patio material performs:
- Gravel patios often need extra attention after winter weather and heavy rainfall.
- Concrete patios can last decades but must be carefully installed and sealed to withstand freeze-thaw cycles without cracking.
- Paver patios typically perform best in our area—handling ground movement gracefully and requiring minimal maintenance after harsh weather.
At Nehemias Landscaping & Construction, we always factor in local conditions when advising Essex County homeowners on the best affordable patio options. Our goal is to give you not just an attractive patio—but one that stands the test of time, too.
The Professional Installation Advantage
DIY can save you money initially. But professional installation by experts (like our talented team!) offers unbeatable benefits:
- Proper drainage: Prevents water pooling and pesky damage later on.
- Solid structural integrity: Ensures your patio base is strong, stable, and properly compacted.
- Warranty peace of mind: Professionals offer guarantees on workmanship and materials.
- Time savings: Experienced crews can finish your patio in days—not weeks or months of DIY weekends.
- Better material access: Contractors have resources to secure quality materials at reasonable costs.
For many Essex County homeowners, a professionally-installed affordable patio—whether concrete or pavers—is a smart investment that balances upfront costs, long-term value, and minimal maintenance.
If you’re ready to explore the options or have more questions, we’re here to help!
5. Enhancing Your Affordable Patio with Container Gardening and Lighting
Your affordable patio is more than just an outdoor space—it’s an extension of your home. But how do you add a splash of style, warmth, and personality without draining your wallet? It’s simple: container gardening and clever outdoor lighting. With these two affordable additions, your patio will quickly become your family’s favorite evening retreat.
Affordable Patio Container Gardening
Imagine stepping onto your patio, sipping your morning coffee surrounded by vibrant blooms, lush greenery, and maybe even a fresh herb garden. Sounds dreamy, right? Container gardening makes this a reality—without expensive landscaping or digging up your yard.
The secret to budget-friendly container gardens is creativity. You don’t need fancy pots from high-priced garden centers. Instead, look around your home or local thrift store for repurposed items. Old buckets, wooden crates, vintage metal tins, and even concrete blocks can create charming, rustic containers. For lightweight and versatile options, affordable plastic planters or grow bags (perfect for veggies!) do the trick. And don’t overlook classic terra cotta pots—they’re inexpensive and age beautifully.
Now, what to plant? Herbs like rosemary, basil, and mint not only look lovely, but you can use them in your kitchen trips too. Succulents are another budget favorite—they’re easy to care for, propagate quickly, and offer unique textures and shapes. For year-round color, mix in perennials divided from your garden or borrowed from friendly neighbors. Bright annual flowers like marigolds, petunias, or zinnias also give your patio cheerful pops of color without breaking the bank.
When arranging your containers, vary plant heights and textures. Place taller or more eye-catching pots at patio corners or as focal points. Group smaller pots to create visual interest, mixing flowering plants and foliage to keep things lively throughout the seasons. The beauty of container gardening is its flexibility—you can easily move pots around for a fresh new look whenever inspiration strikes.
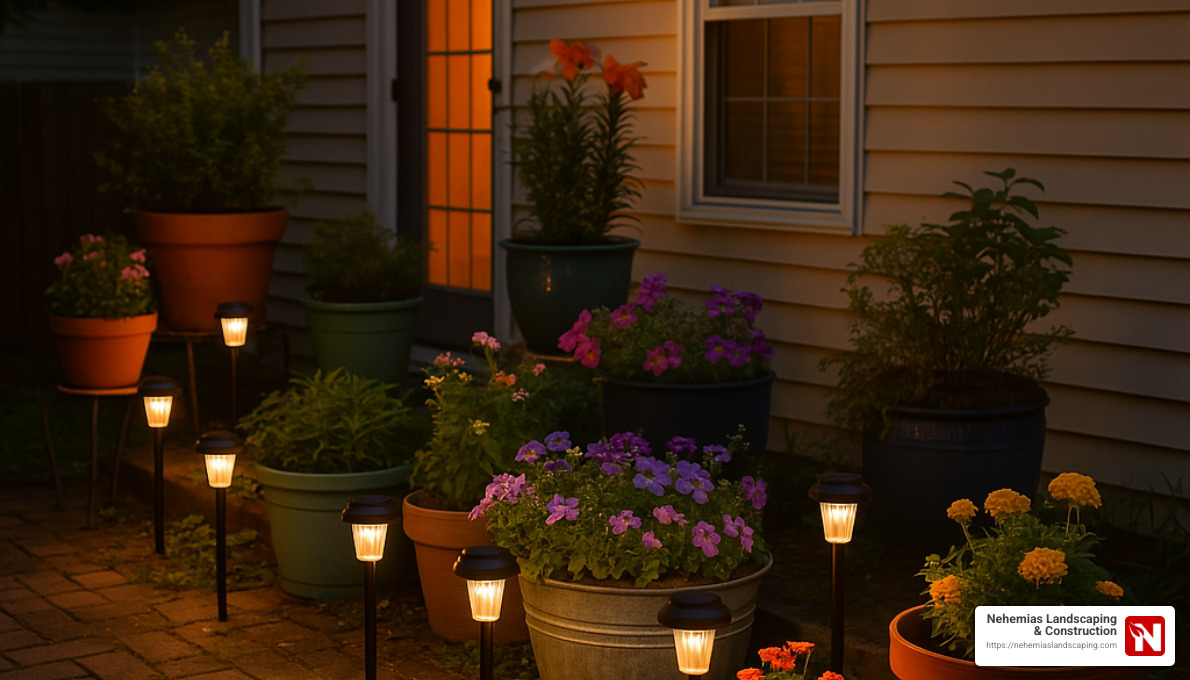
Budget-Friendly Lighting Options for Your Affordable Patio
Outdoor lighting is the magic ingredient that turns a nice patio into a truly inviting space. Thankfully, you don’t need expensive electrical work or complicated wiring to achieve a warm, cozy glow. Let’s explore some wallet-friendly options.
Solar-powered lights are an absolute game-changer. These little wonders charge during the day and automatically illuminate at dusk—all without impacting your electricity bill. Place solar path lights along walkways or around the patio perimeter to guide guests safely. String solar-powered fairy lights above your seating area to create an enchanting canopy of starry ambiance. For movable lighting, try portable solar lanterns—perfect on tables or near seating areas. Solar spotlights can even highlight your gorgeous new container gardens.
According to Benefits of Solar-Powered Lights for Patios, these handy fixtures reduce your carbon footprint, save money, and offer hassle-free installation. What’s not to love?
Beyond solar, indoor/outdoor string lights are another affordable patio favorite—often under $20 per strand. They instantly add a festive, welcoming vibe to your evening gatherings. For a romantic touch, candles placed inside glass lanterns create intimate, flickering warmth. Battery-powered LED lights are also versatile, giving you bright illumination exactly where you need it without cords.
Lighting placement makes all the difference. Illuminate pathways and steps for safety. Add gentle lighting near seating and dining areas—enough to see clearly but soft enough for relaxation. Draw attention to favorite features: your container gardens, an outdoor table, or even a beautiful wall texture. By layering different lighting types and heights, your patio will feel warm, cozy, and inviting—perfect for lingering long into the night.
With thoughtful container gardening and creative lighting, your affordable patio becomes a stylish, welcoming oasis—without overspending. The best part? You get to enjoy every cozy evening and sunny afternoon surrounded by beauty and warmth, right in your backyard.
6. Choosing the Right Patio Design for Your Budget and Space
Selecting the perfect design for your affordable patio means finding the right balance between your available space, your budget, and, most importantly, your lifestyle. At Nehemias Landscaping & Construction, we’ve noticed that the happiest homeowners aren’t necessarily the ones with the largest or priciest patios—they’re the ones whose patios genuinely reflect how they love to live.
“The selection of patio design should reflect your lifestyle needs.” This insight drives everything we do when helping homeowners across Essex County. We believe the best patio isn’t just built; it’s thoughtfully planned around you and your family’s daily routine.
Assessing Your Space
Before jumping into materials or furniture choices, take some time to carefully evaluate your outdoor area. Grab a measuring tape and jot down the dimensions of your available space, noting the shape clearly. Keep an eye out for doors, windows, or any existing pathways connecting to your patio area.
Next, pay attention to sun exposure throughout the day. Trust me, you don’t want your grill placed directly under blazing midday sun (unless you’re aiming for a sunburned chef look!). Check how rainwater naturally flows in your yard, as good drainage is essential for patio longevity. Think about privacy, too—do your neighbors have an easy view, or would you prefer some strategic screening with plants or fences?
Finally, look around. Are there beautiful views you want to highlight—or eyesores you’d love to hide? Making these observations upfront will set a solid foundation for your design.
At Nehemias Landscaping & Construction, we make it our mission to “transform your outdoor space into a stunning and functional environment.” The change begins with a thoughtful space assessment, customized to your needs.
Matching Design to Lifestyle
Not all patios serve the same purpose. A design that’s perfect for your neighbor may be totally wrong for your family. Let’s look at some common scenarios we’ve seen over the years:
For entertaining: If your patio will regularly host gatherings, you’ll want open spaces that allow for mingling, multiple seating options, and clearly defined cooking and dining areas. Incorporating thoughtful lighting will extend the fun into the evening. Ideally, keep your patio near your indoor kitchen or dining area for effortless hosting.
For families with children: If your little ones turn every outdoor space into an imaginary pirate ship or soccer field, durability and safety are key. Choose sturdy materials that can handle plenty of playtime, and avoid sharp edges or corners. Leave room for running around and consider positioning your patio near play equipment for easy supervision.
For pure relaxation: Dreaming of peaceful evenings curled up with a good book? Consider comfort first, with permanent, cozy seating and built-in shade options for sunny afternoons. A fire pit or gentle water feature can provide calming ambiance, and privacy screening keeps disturbances at bay.
For seamless indoor-outdoor living: Love blurring the lines between inside and out? Align indoor and outdoor flooring levels for visual harmony, and select patio materials that complement your home’s interior style. Protective elements like a roof or pergola ensure usability in all weather, allowing for year-round enjoyment.
Budget-Conscious Design Strategies
If you’re watching your budget (and who isn’t?), don’t worry—you can still create a gorgeous, functional patio. One smart approach is phasing your project. Start with the essentials, such as a durable foundation and basic seating area, then add dream features—like a fire pit, outdoor kitchen, or lighting—over time as your budget allows.
Another trick is creating smaller “zones” within your patio. Splurge a bit on quality materials for higher-use areas like dining or lounging spaces, and choose more budget-friendly options elsewhere. Incorporate existing elements like mature trees or garden beds to add instant charm without additional cost.
Multi-functional features are your wallet’s best friend. Think of benches with built-in storage or retaining walls doubling as seating. And remember, a small patio designed with care and proper proportions feels far more luxurious than a sprawling space without thoughtful planning.
Our Patio Design and Build services help homeowners steer all these choices, making sure every dollar invested contributes directly to your enjoyment and comfort.
Working with Local Builders for Optimal Results
Partnering with experienced local builders like Nehemias Landscaping & Construction is often your best bet for maximizing value and minimizing headaches. Our in-depth knowledge of Essex County’s climate helps us recommend materials and designs that stand up to New England weather. (Trust me, we’ve seen our fair share of freezing winters and scorching summers!)
Local professionals also simplify the permitting process, ensuring your project meets town requirements. We offer insight based on countless similar projects, helping you avoid common pitfalls and maximize your space’s potential. Thanks to our industry connections, we can often source high-quality materials at great prices, stretching your budget further.
Most importantly, choosing a reliable local builder means you gain a long-term partner. As your family grows and lifestyle changes, we’re here to help your outdoor space evolve right along with you.
We promise to make your patio project “the easiest project you have ever completed at your home.” Our friendly and professional team guides you smoothly from initial ideas to that first relaxing evening in your beautiful, affordable patio.
7. Avoiding Common Mistakes in Budget-Friendly Patio Builds
Creating an affordable patio doesn’t mean cutting corners. In fact, when homeowners rush or skip key steps, they often end up spending more down the road. Let’s explore some common pitfalls and how you can easily steer clear of them.
Poor Planning and Hasty Decisions
One of the biggest mistakes homeowners make is diving right into their patio project without proper planning. Rushing into things can lead to costly fixes later—like building a patio too small and needing an expensive expansion in a few years, or placing it without considering sun exposure, wind patterns, or your favorite views.
Another common oversight is forgetting to think through how people will move from indoors to outdoors. Ignoring traffic flow often results in frustration later on.
And don’t skip checking for underground utilities! Accidentally hitting a water or gas line can turn your DIY project into a costly nightmare. As Brian Balado, a homeowner who partnered with our team said, “Working with the team was an awesome experience. As someone in the industry, I was truly impressed and couldn’t believe the standard held.” Good planning pays off every time.
Instead, try outlining your patio area with string or hoses first. Watch how the sun moves throughout the day. Think about how you’ll actually use the space in each season. Investing time planning now saves big headaches later.
Skimping on Foundation Work
No one sees the foundation beneath your beautiful patio—but neglecting it is one of the quickest ways to ruin your investment. Common foundation mistakes include not excavating deeply enough, skipping proper compaction, or overlooking drainage.
Larry Betro, one of our delighted clients, shared, “We had a wonderful experience from start to finish. The team was great to work with! We will have them back for more projects for sure!” Larry’s satisfaction came from knowing the job was done right—from foundation to finishing touches.
When building your patio, never cut corners on foundation preparation. Using the right depth of compacted gravel or crushed stone base, installing proper edging, and creating an adequate slope for drainage are absolutely essential. Your patio’s lifespan depends on it.
Choosing Materials Based Solely on Initial Cost
It’s tempting to go for the cheapest materials at the hardware store. But remember, low initial cost doesn’t always mean low overall cost—especially if your materials fail prematurely.
For instance, cheap concrete might crumble quickly after a few harsh winters. Thin, low-quality pavers can chip or fade in just a couple of seasons. Even choosing decorative gravel that’s too loose can create constant maintenance headaches.
Instead, think about durability and lifetime value. Often, selecting slightly higher-quality materials can double or even triple the life of your affordable patio, saving money in the long run.
DIY Without Proper Knowledge
While DIY can definitely help keep costs down, not being realistic about your skills or available time can quickly derail your patio plans. Patio installation involves heavy lifting, specialized tools, and critical steps like proper compaction and drainage.
Many times, inexperienced homeowners underestimate the physical labor required or lack the right tools—leading to costly tool rentals or professional help after mistakes are already made. Plus, a professional crew can complete in a few days what might take you weeks of back-breaking weekend work.
Be honest about your abilities and availability. If you’re unsure about certain steps, consider professional help for critical portions and take on simpler tasks yourself to balance cost with quality.
Neglecting Permits and Codes
Ignoring local permitting rules or building codes might seem like a shortcut, but it can cost you big time in fines or even force you to tear out your beautiful new patio. Common oversights include building too close to property lines, exceeding impervious surface limits, and not accounting properly for drainage issues.
At Nehemias Landscaping & Construction, our Patio Contractors Near Me services include handling permits and understanding local Essex County regulations. Working with experienced professionals from the start can help you steer these requirements painlessly.
Forgetting About Lighting and Electrical Needs
Imagine finishing your stunning patio, sitting down for a relaxing evening—and realizing you forgot lighting! Retrofitting electrical elements after your patio is built is costly and messy.
Even if your current budget doesn’t allow for installing lights and outlets right away, running empty conduit beneath your patio during construction is an inexpensive way to prepare for future lighting, speakers, or other electrical amenities. This small step saves tons of stress (and money!) down the road.
By carefully avoiding these common mistakes, you’ll ensure your affordable patio is a source of enjoyment for years—not a source of frustration. And remember, at Nehemias Landscaping & Construction, we’re here to guide you every step of the way, making sure your patio comes out exactly as you envisioned—beautiful, functional, and built to last.
8. Maintaining Your Affordable Patio for Longevity
You’ve invested time and money into creating your dream affordable patio, and regular maintenance is the secret sauce to keeping it beautiful and functional for years. Don’t worry—patio care doesn’t have to feel like a full-time job! With a clear seasonal routine and a few quick tips, you can preserve your outdoor space and avoid costly repairs down the road.
Seasonal Maintenance Schedule
The changing seasons in Essex County can be rough on outdoor spaces, so following a basic seasonal schedule will help your patio weather the elements gracefully.
Spring is the perfect time for a fresh start. Clear away winter debris and give your patio a thorough cleaning to remove dirt, salt, and grime. Take a close look for frost damage—like cracks in concrete or shifted pavers—and address these issues immediately. After spring showers, keep an eye out for drainage problems. Early spring is also ideal for checking and sealing your patio surface if needed (typically every 2-3 years). Don’t forget to inspect and clean your outdoor furniture to prepare it for warm-weather enjoyment.
During the sunny summer months, do quick, regular cleanups. Sweep away leaves, dirt, and debris often. If you spot spills from food, drinks, or sunscreen, clean them promptly to avoid stains becoming permanent. Pull any weeds popping up through gravel or paver joints before they become stubborn guests. If you have a pool nearby, rinse off any chlorine or salt regularly to prevent discoloration or damage. And remember, adjust umbrellas or shade structures to protect furniture and patio surfaces from excessive sun exposure.
As leaves start to fall in autumn, clear your patio frequently to prevent staining and moss buildup. Trim any overhanging branches to reduce debris and avoid damage during winter storms. Fall’s also the ideal time to clean and store patio furniture you won’t be using during winter. Before the snow comes, check again for loose pavers or cracks and repair them to reduce the chance of winter damage. If your patio surface needs sealing, apply a coat before temperatures drop.
In winter, gentle care goes a long way. Always choose plastic snow shovels instead of metal ones to avoid scratching surfaces. For ice control, select pet-friendly ice melt products and steer clear of harsh salts, especially on newer concrete surfaces. Clear standing water or ice quickly to prevent freeze-related issues, and regularly remove heavy snow loads from patio covers or roofs to prevent structural issues.
Material-Specific Maintenance Tips
Different patio types require slightly different care routines. Here’s how to keep each material looking its best:
For gravel patios, regularly rake the surface to maintain a neat, even appearance. Gravel typically needs a refresh every 2-3 years, so plan to add a thin layer occasionally. Installing landscape fabric under your gravel can significantly cut down on weed growth. For busy areas, consider gravel stabilizers to keep stones in place. Always pay close attention to drainage issues to prevent gravel washout.
If you have a concrete patio, keep it clean using mild soap and water—harsh chemicals can damage sealants. Address small cracks quickly to prevent them from expanding. Applying a fresh sealant every 2-3 years protects the patio from stains, fading, and weather damage. Using furniture pads under chairs and tables keeps your concrete looking pristine.
Maintaining your paver patio is straightforward, too. Regular sweeping prevents dirt from settling into joints. After heavy rainstorms, check the joint sand and replenish if needed—using polymeric sand can be particularly effective. For damaged pavers, the good news is individual pieces can be easily replaced, saving you money on repairs. Applying an appropriate paver sealer every few years preserves colors and protects surfaces.
“I have used Affordable Patio three times now for different projects and have always been happy with their service,” says homeowner Tim Rueda. This underscores how regular maintenance, combined with skilled installation, helps your patio stay attractive and functional for many years.
Furniture and Accessory Care
Your patio furniture deserves some love too! Cover or store items during extreme weather or when not in use to prolong their lifespan. Regularly clean cushions according to manufacturer guidelines, and each spring, take a moment to tighten hardware and inspect furniture frames. Wooden furniture benefits from an annual touch-up of paint or stain, while metal pieces can be protected against rust with weather-resistant sealants. For detailed care advice, check out this handy Outdoor Furniture Maintenance Guide.
When to Call Professionals
While you can handle most maintenance tasks yourself, some issues require professional expertise. For example, significant settling or shifting of your patio surface indicates deeper problems. Large cracks in concrete might signal structural issues, while serious drainage problems can impact your home’s foundation. If you notice retaining wall movement, bulging, or major displacement of pavers, it’s time to call in the pros.
At Nehemias Landscaping & Construction, our team is experienced in addressing these tougher patio challenges quickly and affordably. “The entire project is thoroughly planned out and executed appropriately,” shared Tim Rueda, reflecting the benefit of professional support.
With the right care routine, your affordable patio will remain the cozy, beautiful outdoor retreat you envisioned—giving you more time to relax and less reason to worry!
Frequently Asked Questions about Affordable Patios
What are common mistakes to avoid when building a budget-friendly patio?
When planning an affordable patio, it’s natural to look for ways to save money. But cutting corners in the wrong places can lead to headaches down the line. Here are some common pitfalls to avoid on your patio project.
First, skipping or neglecting proper base preparation is one of the biggest mistakes you can make. A patio’s foundation needs careful excavation, adequate compaction, and proper drainage planning. Ignore these steps, and you risk settling, cracking, and costly repairs later.
Another frequent error is basing your material choices solely on initial cost. Thinner or lower-quality pavers may save you a dollar or two per square foot at first. But guess what? They’re more likely to crack, fade, or wear out quickly—costing you more in repairs and replacements down the road.
Improper installation techniques can sabotage your patio’s longevity, even if you pick high-quality materials. Incorrect joint spacing, missing edge restraints, or insufficient slope for drainage can quickly lead to issues like water pooling or uneven surfaces.
Don’t overlook your local climate, either. Here in Essex County, Massachusetts, our beautiful seasons mean your patio materials must handle freeze-thaw cycles gracefully. Choosing materials poorly suited to our local weather can shorten your patio’s lifespan significantly.
Finally, the boring but important stuff: permits and codes. Building without the right permissions can turn your affordable dream into an expensive nightmare, complete with fines or even a removal order. (Yikes!)
As Julia Nagle, one of our happy clients, shared: “I just had my patio done and from start to finish everything went amazingly smooth. No hidden costs, no surprises. The process was transparent and stress-free.” Proper planning with professional guidance makes all the difference.
How can I maintain my affordable patio to ensure longevity?
Taking care of your affordable patio ensures it stays beautiful and functional for years. Thankfully, patio maintenance doesn’t have to be complicated or expensive—just regular and consistent.
Keep up with regular cleaning. Sweep weekly to clear away dirt and debris, and perform deeper cleanings every month or two. Promptly remove stains or leaves to prevent discoloration. This simple habit alone goes a long way in preserving your patio’s appearance.
Make seasonal inspections a routine. After the harsh winter months, carefully check your patio for damage. Fix minor issues promptly, before they become bigger headaches. Preparing for each season’s unique challenges—like winter ice or summer storms—helps maintain your patio’s integrity.
Sealing your patio regularly is critical, especially if you have concrete or pavers. Most patios benefit from resealing every 2-3 years to protect them from the elements. For paver patios specifically, don’t forget about joint sand. Replenish yearly, and consider using polymeric sand for stronger, more stable joints.
Weeds are another enemy you’ll want to tackle early. Use pre-emergent herbicides in early spring to keep weeds at bay, and pull any stragglers promptly. This helps avoid stubborn roots and keeps your patio looking tidy.
Also, pay attention to your outdoor furniture. Protective pads under furniture legs prevent scratches, and cleaning spills immediately helps keep surfaces pristine. During harsh weather or off-seasons, cover or store your furnishings to extend their life.
Lastly, winter care matters. Choose plastic snow shovels instead of metal to avoid scratches, use pet-friendly ice melt products, and steer clear of harsh deicing salts on new concrete to prevent damage.
As Brian Balado, a satisfied client, says, “Working with the team was an awesome experience. As someone in the industry, I was truly impressed and couldn’t believe the standard held.” Good initial installation makes long-term maintenance even easier.
Can local builders help me save money on my affordable patio project?
Absolutely! While hiring a professional might seem like an added expense, partnering with a trusted local builder like Nehemias Landscaping & Construction can actually save you money overall.
How does that work? To start, professional contractors typically receive wholesale pricing on materials—often 15-30% below what you’d pay at retail stores. Over the span of your entire project, these savings really add up.
Local builders also bring their own equipment. This eliminates rental costs, and since professionals complete projects faster and more efficiently, labor expenses are lower, too.
An experienced builder knows how to accurately estimate materials, meaning less waste, fewer unnecessary purchases, and more savings in your pocket. Plus, professional installation guarantees you avoid common (and expensive) rookie mistakes that would require costly corrections later.
Then there’s the value of time. A project that might take you several weekends of backbreaking work can often be completed by pros in just a few days. That means you get to enjoy your new patio sooner, with way less hassle and stress.
Local experts also bring design expertise and knowledge of regional challenges. They’ll recommend materials and solutions perfect for Essex County’s climate, helping you avoid future headaches and costly upkeep.
Finally, let’s talk peace of mind. Most professional services offer warranties on workmanship, so if something goes wrong, you’re covered.
When you’re ready to get started, our Patio Paver Installers in My Area page connects you to skilled professionals who truly understand local conditions and building codes.
Elizabeth Donohue, one of our happy homeowners, summed it up perfectly: “You guys killed it. Thanks for rocking out the back patio. We’re super excited to make new memories.” That’s the kind of joy that professional guidance brings to your affordable patio project.
Conclusion
Creating an affordable patio doesn’t mean settling for less – it’s about making smart choices that balance beauty, function, and budget. Throughout this guide, we’ve shown how thoughtful planning and material selection can transform your outdoor space without emptying your wallet.
At Nehemias Landscaping & Construction, we see it happen every day. Essex County homeowners find that their dream outdoor spaces are more achievable than they thought. Our approach blends craftsmanship with cost-consciousness, creating patios that families enjoy for years while protecting their investment.
What have we learned about creating patios that don’t break the bank?
First, material selection matters more than you might think. The cheapest option upfront isn’t always the most affordable long-term. Gravel might seem like the budget winner, but when you factor in maintenance and refreshing, concrete or pavers often provide better value over time.
Second, design your patio for how you actually live, not just how it looks in magazines. The most beautiful patio won’t be worth the investment if it doesn’t support your family’s lifestyle and entertainment needs.
Third, never compromise on foundation work. We’ve seen too many “budget” patios fail prematurely because corners were cut on excavation, drainage, or compaction. Doing it right the first time always costs less than doing it twice!
Fourth, professional installation often proves most economical in the long run. Between material discounts, equipment efficiency, and avoiding costly mistakes, the professional advantage typically outweighs the DIY savings.
Finally, regular maintenance extends patio life dramatically. Simple seasonal care prevents expensive repairs and keeps your outdoor space looking its best year after year.
“We put this program together to help you understand the entire process from start to finish.” This commitment to education guides everything we do at Nehemias. We believe informed homeowners make better decisions and enjoy better results.
Whether you’re dreaming of a simple gravel gathering space, a stamped concrete entertaining area, or an elaborate paver patio, our team brings the expertise to create an outdoor haven that fits your budget while exceeding expectations.
Ready to explore how we can bring your affordable patio vision to life? Visit our comprehensive resource on Patios and Firepits or contact us today to schedule a consultation. We proudly serve communities throughout Essex County, including Beverly, Danvers, Essex, Georgetown, Gloucester, and beyond.
Let’s create that special outdoor space where your family will gather and memories will be made – without breaking the bank.